404 Not Found
Not Found
The requested URL was not found on this server.
Apache/2.4.63 (Ubuntu) Server at doc.akka.io Port 443
404 Not Found
Not Found
The requested URL was not found on this server.
Apache/2.4.63 (Ubuntu) Server at doc.akka.io Port 443
- [Akka](../index.html)
- [Developing](index.html)
- [Setup and configuration](setup-and-configuration/index.html)
- [Access Control Lists (ACLs)](access-control.html)
# Access Control Lists (ACLs)
The simplest access control that the Akka offers is through Access Control Lists (ACLs). ACLs allow you to
specify lists of what can access your services, at multiple granularity. For example, you can configure a method that
initiates a payment on a payment service to only accept requests from the shopping cart service. You can also control
whether services or methods can be invoked from the Internet.
For a conceptual introduction, see [Access control lists](../concepts/acls.html) in the **Concepts** section.
## Principals
A principal in Akka is an abstract concept that represents anything that can make or be the source of a request.
Principals that are currently supported by Akka include other services, and the internet. Services are identified
by the service name chosen when deployed. Akka uses mutual TLS (mTLS) to associate requests with one or more principals.
Note that requests that have the internet principal are requests that Akka has identified as coming through the Akka
ingress route. This is identified by mTLS, however it does not imply that mTLS has been
used to connect to the ingress from the client in the internet. These are separate hops. To configure mTLS from
internet clients, see [TLS certificates](../operations/tls-certificates.html).
## Configuring ACLs
Akka SDK ACLs consist of two lists of principal matchers. One to allow to invoke a method, and the other to deny to
invoke a method. For a request to be allowed, at least one principal associated with a request must be matched by at
least one principal matcher in the allow list, and no principals associated with the request may match any principal
matchers in the deny list.
An ACL can be configured at the class level, or at the method level. If an ACL is configured at the class level it
applies to all methods in the class. Unless it’s overridden by an ACL added at method level.
Here is an example of an ACL added at the class level on an HTTP Endpoint:
[UserEndpoint.java](https://github.com/akka/akka-sdk/blob/main/samples/doc-snippets/src/main/java/com/example/acl/UserEndpoint.java)
```java
@Acl(allow = @Acl.Matcher(service = "service-a"))
@HttpEndpoint("/user")
public class UserEndpoint extends AbstractHttpEndpoint { // (1)
// ...
}
```
The above ACL only allows incoming traffic from `service-a`. Meaning that only a service named `service-a` deployed on that same project will be able to make calls to this endpoint. This rule is applied to all methods in this HTTP Endpoint.
This rule can be overridden by an ACL on a method level. Here is an example ACL on a method that overrides the class level ACL:
[UserEndpoint.java](https://github.com/akka/akka-sdk/blob/main/samples/doc-snippets/src/main/java/com/example/acl/UserEndpoint.java)
```java
@Acl(allow = @Acl.Matcher(service = "service-a"))
@HttpEndpoint("/user")
public class UserEndpoint extends AbstractHttpEndpoint { // (1)
// ...
@Post
@Acl(allow = @Acl.Matcher(service = "service-b"))
public Done createUser(CreateUser create) {
//... create user logic
return Done.getInstance();
}
}
```
Note that an ACL defined on a method completely overrides an ACL defined at class level. It does not add to
it.
You can combine `allow` and `deny` rules. In the following example, access is open to all other services, except `service-b`.
[UserEndpoint.java](https://github.com/akka/akka-sdk/blob/main/samples/doc-snippets/src/main/java/com/example/acl/UserEndpoint.java)
```java
@Acl(allow = @Acl.Matcher(service = "*"), deny = @Acl.Matcher(service = "service-b"))
```
To allow all traffic:
[UserEndpoint.java](https://github.com/akka/akka-sdk/blob/main/samples/doc-snippets/src/main/java/com/example/acl/UserEndpoint.java)
```java
@Acl(allow = @Acl.Matcher(principal = Acl.Principal.ALL))
```
To allow only traffic from the internet:
[UserEndpoint.java](https://github.com/akka/akka-sdk/blob/main/samples/doc-snippets/src/main/java/com/example/acl/UserEndpoint.java)
```java
@Acl(allow = @Acl.Matcher(principal = Acl.Principal.INTERNET))
```
To allow traffic from `service-a` and `service-b`:
[UserEndpoint.java](https://github.com/akka/akka-sdk/blob/main/samples/doc-snippets/src/main/java/com/example/acl/UserEndpoint.java)
```java
@Acl(allow = { @Acl.Matcher(service = "service-a"), @Acl.Matcher(service = "service-b") })
```
To block all traffic, an ACL with no allows can be configured:
[UserEndpoint.java](https://github.com/akka/akka-sdk/blob/main/samples/doc-snippets/src/main/java/com/example/acl/UserEndpoint.java)
```java
@Acl(allow = {})
```
## Default ACL
If no ACLs are defined at all, Akka will deny requests from both other services and the internet to all components of
an Akka service.
| | The endpoint in the [getting started sample](../getting-started/author-your-first-service.html) has a very permissive ACL that opens access to public internet requests. This allows for easy try out and testing. For production usage, make sure to add appropriate ACL restrictions. |
### Customizing the deny code
When a request is denied, by default a 403 `Forbbiden`, is sent. The code that is returned when a request is denied can be customised using the `deny_code` property.
For example, to make Akka reply with 404, `Not Found`:
[UserEndpoint.java](https://github.com/akka/akka-sdk/blob/main/samples/doc-snippets/src/main/java/com/example/acl/UserEndpoint.java)
```java
@Acl(allow = @Acl.Matcher(service = "service-a"),
denyCode = 404)
@HttpEndpoint("/user")
public class UserEndpoint extends AbstractHttpEndpoint { // (1)
// ...
}
```
Similar to allow and deny rules, deny codes defined at class level are applied to all methods in the component, but
can be overwritten on a per method base.
## Backoffice and self invocations
Invocations of methods from the same service, or from via the backoffice proxy that is available to developers, are always
permitted, regardless of what ACLs are defined on them.
| | The `akka service proxy` command creates an HTTP proxy that forwards all
traffic to a service. This allows you to interact with the service as if it was running locally. |
## Programmatically accessing principals
The current principal associated with a request can be accessed through the `RequestContext`.
| | Endpoints are stateless and each request is served by a new Endpoint instance. Therefore, the `RequestContext` is always a new instance and is associated with the request currently being handled. |
[UserEndpoint.java](https://github.com/akka/akka-sdk/blob/main/samples/doc-snippets/src/main/java/com/example/acl/UserEndpoint.java)
```java
@HttpEndpoint("/user")
public class UserEndpoint extends AbstractHttpEndpoint { // (1)
// ...
var principals = requestContext().getPrincipals();
}
```
| **1** | Let your endpoint extend [AbstractHttpEndpoint](_attachments/api/akka/javasdk/http/AbstractHttpEndpoint.html) to get access to the request specific `RequestContext` through `requestContext()`. |
You can access the current Principals through method `RequestContext.getPrincipals()`
If the request came from another service, the `Principals.getLocalService()` method will return a non-empty `Optional` containing the name of the service that made the request. Akka guarantees that this field will only be
present from an authenticated principal, it can’t be spoofed.
Further, you can use `Principals.isInternet`, `Principals.isSelf` or `Principals.isBackoffice` to verify if the request
was made from the Internet, from the current service or from the Backoffice API respectively. Backoffice requests are
those made using the `akka services proxy` command, they are authenticated and authorized to ensure only developers
of your project can make them.
[UserEndpoint.java](https://github.com/akka/akka-sdk/blob/main/samples/doc-snippets/src/main/java/com/example/acl/UserEndpoint.java)
```java
@Get
public String checkingPrincipals() {
var principals = requestContext().getPrincipals();
if (principals.isInternet()) {
return "accessed from the Internet";
} else if (principals.isSelf()) {
return "accessed from Self (internal call from current service)";
} else if (principals.isBackoffice()) {
return "accessed from Backoffice API";
} else {
return "accessed from another service: " + principals.getLocalService();
}
}
```
## Local development with ACLs
When running locally, ACLs are enabled by default. You can disable the local ACL checks by configuring the following settings in the `application.conf` file:
src/main/resources/application.conf
```conf
akka.javasdk.dev-mode.acl.enabled = false
```
Alternatively, start with:
```shell
mvn compile exec:java -Dakka.javasdk.dev-mode.acl.enabled=false
```
Note that the setting above does not apply to integration tests. See below for how to disable ACLs in integration tests.
### Service identification
If running multiple services in local development, you may want to run with ACLs enabled to verify that they work for
cross-service communication.
Let’s consider the existence of two distinct services called `shopping-cart` and `payment`.
The payment service only accepts request from the shopping cart service and has an ACL defined as
such:
[PaymentEndpoint.java](https://github.com/akka/akka-sdk/blob/main/samples/doc-snippets/src/main/java/com/example/acl/PaymentEndpoint.java)
```java
@Acl(allow = @Acl.Matcher(service = "shopping-cart"))
@HttpEndpoint("/payments")
public class PaymentEndpoint {
//...
}
```
During development, if you want to make calls to the payment service from inside the shopping cart service, then the
shopping cart service needs to identify itself as `shopping-cart` (as per PaymentEndpoint’s ACL). When running
locally, the services identify themselves with the name used in the `artifactId` tag in its `pom.xml` file. This value can be
overwritten in the project’s `application.conf` file by defining a maven property named `akka.javasdk.dev-mode
.service-name`.
The `application.conf` needs to be located in the project’s main resources directory, i.e.: `src/main/resources`.
src/main/resources/application.conf
```conf
akka.javasdk.dev-mode.service-name=shopping-cart
```
| | This property is only applicable when running the services on your local machine. When deployed, the service name
is the one used to create the service and should also match the ACL definition, i.e.: `shopping-cart`. |
If you want to simulate calls to the payment endpoint and pretend that the calls are
coming from the shopping cart service, you can add the header `impersonate-service` to your requests, for example:
```bash
curl -i localhost:9000/payments/{cart-id}/check-transaction \
--header "impersonate-service: shopping-cart"
```
Note that in local development, the services don’t actually authenticate with each other, they only pass their identity in a header. It is assumed in local development that a client can be trusted to set that header correctly.
### Running unit tests
In the generated unit test testkits, the ACLs are ignored.
### Running integration tests
ACLs are enabled by default when running integration tests.
ACL rules will be applied whenever a call is made using testkit’s `HttpClient`. Those calls are interpreted as
originating from the internet. You can disable the ACL checks by overriding the `testKitSettings()` method.
[UserEndpointIntegrationTest.java](https://github.com/akka/akka-sdk/blob/main/samples/doc-snippets/src/test/java/com/example/acl/UserEndpointIntegrationTest.java)
```java
public class UserEndpointIntegrationTest extends TestKitSupport {
@Override
protected TestKit.Settings testKitSettings() {
return super.testKitSettings().withAclDisabled();
}
}
```
Calls made through the `ComponentClient` are internal to the service and therefore no ACL rule is applied.
[Errors and failures](errors-and-failures.html) [JSON Web Tokens (JWT)](auth-with-jwts.html)
404 Not Found
Not Found
The requested URL was not found on this server.
Apache/2.4.63 (Ubuntu) Server at doc.akka.io Port 443
404 Not Found
Not Found
The requested URL was not found on this server.
Apache/2.4.63 (Ubuntu) Server at doc.akka.io Port 443
- [Akka](../index.html)
- [Developing](index.html)
- [Setup and configuration](setup-and-configuration/index.html)
- [JSON Web Tokens (JWT)](auth-with-jwts.html)
# JSON Web Tokens (JWT)
This section describes the practical aspects of using JSON Web Tokens (JWTs). If you are not sure what JWTs are, how they work or how to generate them, see [JSON Web Tokens](../reference/jwts.html) first.
Akka’s JWT support is configured by placing annotations in your endpoints at the class level or method level.
## Authentication
Akka can validate the signature of JWT tokens provided in an Authorization header to grant access to your endpoints. The generation of tokens is not provided by Akka. In [https://jwt.io/](https://jwt.io/) you can find a simple way to generate tokens to start testing your services.
### Bearer token validation
If you want to validate the bearer token of a request, you need to annotate your endpoint with a `@JWT` setting with `JWT.JwtMethodMode.BEARER_TOKEN` and you can add an issuer claim. Like this:
[HelloJwtEndpoint.java](https://github.com/akka/akka-sdk/blob/main/samples/endpoint-jwt/src/main/java/hellojwt/api/HelloJwtEndpoint.java)
```java
import akka.javasdk.annotations.JWT;
import akka.javasdk.annotations.http.HttpEndpoint;
@HttpEndpoint("/hello")
@JWT(validate = JWT.JwtMethodMode.BEARER_TOKEN, bearerTokenIssuers = "my-issuer") // (1)
public class HelloJwtEndpoint extends AbstractHttpEndpoint {
}
```
| **1** | Validate the Bearer is present in the `Authorization` header and authorize only if the claim `iss` in the payload of this token is `my-issuer`. |
Requests are only allowed if they have a bearer token that can be validated by one of the configured keys for the service, all other requests will be rejected. The bearer token must be supplied with requests using the `Authorization` header:
Authorization: Bearer eyJhbGciOiJIUzI1NiIsImtpZCI6ImtleTEifQ.eyJpc3MiOiJteS1pc3N1ZXIifQ.-MLcf1-kB_1OQIZdy9_wYiFZcMOHsHOE8aJryS1tWq4 You can check in [https://jwt.io/](https://jwt.io/) that this token contains the claim in the payload `iss: my-issuer`.
| | It is recommended that `bearerTokenIssuers` contains the issuer that you use in your JWT key configuration. See [https://doc.akka.io/security/jwts.html](https://doc.akka.io/security/jwts.html). Otherwise, any services with a trusted key can impersonate the issuer. |
### Configuring JWT at class level or method level
The above examples show how to configure a JWT token on a class or method level. When the annotation is present on both endpoint class and a method, the configuration on the method overrides the class configuration for that method.
### Using more claims
Akka can be configured to automatically require and validate other claims than the issuer. Multiple `StaticClaim` can be declared and environment variables are supported on the `values` field. A `StaticClaim` can be defined both at class and method level. The provided claims will be used when validating against the bearer token.
```java
@JWT(validate = JWT.JwtMethodMode.BEARER_TOKEN,
bearerTokenIssuers = "my-issuer",
staticClaims = {
@JWT.StaticClaim(claim = "role", values = {"admin", "editor"}), // (1)
@JWT.StaticClaim(claim = "aud", values = "${ENV}.akka.io")}) // (2)
```
| **1** | When declaring multiple values for the same claim, **all** of them will be required when validating the request. |
| **2** | The required value of the `aud` claim includes the value of environment variable `ENV` |
See `akka service deploy -h` for details on how to set environment variables when deploying a service.
| | For specifying an issuer claim (i.e. "iss"), you should still use the `bearerTokenIssuers` and not static claims. |
#### Configuring claims with a pattern
Claims can also be defined using a pattern. This is useful when the value of the claim is not completely known in advance, but it can still be validated against a regular expression. See some examples below:
```java
@JWT(validate = JWT.JwtMethodMode.BEARER_TOKEN,
bearerTokenIssuers = "my-issuer",
staticClaims = {
@JWT.StaticClaim(claim = "role", pattern = "^(admin|editor)$"), // (1)
@JWT.StaticClaim(claim = "sub", pattern = // (2)
"^[0-9a-fA-F]{8}-[0-9a-fA-F]{4}-[0-9a-fA-F]{4}-[0-9a-fA-F]{4}-[0-9a-fA-F]{12}$"),
@JWT.StaticClaim(claim = "name", pattern = "^\\S+$") // (3)
})
```
| **1** | Claim "role" must have one of 2 values: `admin` or `editor`. |
| **2** | Claim "sub" must be a valid UUID. |
| **3** | Claim "name" must be not empty. |
If the JWT token claim is an array of values, the token will be considered valid if at least one of the claim values matches the pattern. Otherwise, the request is rejected.
| | A claim can be defined with a `values` or a `pattern`, but not both. |
#### Multiple issuers
Multiple issuers may be allowed, by setting multiple `bearer_token_issuer` values:
```java
@JWT(
validate = JWT.JwtMethodMode.BEARER_TOKEN,
bearerTokenIssuers = { "my-issuer", "my-issuer2" },
staticClaims = @JWT.StaticClaim(claim = "sub", values = "my-subject")
)
```
The token extracted from the bearer token must have one of the two issuers defined in the annotation.
Akka will place the claims from the validated token in the [RequestContext](_attachments/api/akka/javasdk/http/RequestContext.html), so you can access them from your service via `getJwtClaims()`. The `RequestContext` is accessed by letting the endpoint extend [AbstractHttpEndpoint](_attachments/api/akka/javasdk/http/AbstractHttpEndpoint.html) which provides the method `requestContext()`, so you can retrieve the JWT claims like this:
[HelloJwtEndpoint.java](https://github.com/akka/akka-sdk/blob/main/samples/endpoint-jwt/src/main/java/hellojwt/api/HelloJwtEndpoint.java)
```java
import akka.javasdk.annotations.http.HttpEndpoint;
public class HelloJwtEndpoint extends AbstractHttpEndpoint {
@JWT(
validate = JWT.JwtMethodMode.BEARER_TOKEN,
bearerTokenIssuers = { "my-issuer", "my-issuer2" },
staticClaims = @JWT.StaticClaim(claim = "sub", values = "my-subject")
)
@Get("/claims")
public String helloClaims() {
var claims = requestContext().getJwtClaims(); // (1)
var issuer = claims.issuer().get(); // (2)
var sub = claims.subject().get(); // (2)
return "issuer: " + issuer + ", subject: " + sub;
}
}
```
| **1** | Access the claims from the request context. |
| **2** | Note that while calling `Optional#get()` is generally a bad practice, here we know the claims must be present given the `@JWT` configuration. |
## Running locally with JWTs enabled
When running locally, by default, a dev key with id `dev` is configured for use. This key uses the JWT `none` signing algorithm, which means the signature of the received JWT tokens is not validated. Therefore, when calling an endpoint with a bearer token, only the presence and values of the claims are validated.
## JWTs when running integration tests
When running integration tests, JWTs will still be enforced but its signature will not be validated, similarly to what is described above for when running locally. Thus, when making calls in the context of integration testing, make sure to inject a proper token with the required claims, as shown below:
[HelloJwtIntegrationTest.java](https://github.com/akka/akka-sdk/blob/main/samples/endpoint-jwt/src/test/java/hellojwt/api/HelloJwtIntegrationTest.java)
```java
@Test
public void shouldReturnIssuerAndSubject() throws JsonProcessingException {
String bearerToken = bearerTokenWith(Map.of("iss", "my-issuer", "sub", "my-subject")); // (1)
StrictResponse call = httpClient
.GET("/hello/claims")
.addHeader("Authorization", "Bearer " + bearerToken) // (2)
.responseBodyAs(String.class)
.invoke();
assertThat(call.body()).isEqualTo("issuer: my-issuer, subject: my-subject");
}
private String bearerTokenWith(Map claims) throws JsonProcessingException {
// setting algorithm to none
String header = Base64.getEncoder()
.encodeToString(
"""
{
"alg": "none"
}
""".getBytes()
); // (3)
byte[] jsonClaims = JsonSupport.getObjectMapper().writeValueAsBytes(claims);
String payload = Base64.getEncoder().encodeToString(jsonClaims);
// no validation is done for integration tests, thus no signature required
return header + "." + payload; // (4)
}
```
| **1** | Use a helper method to create a JWT token with 2 claims: issuer and subject. |
| **2** | Inject the bearer token as header with the key `Authorization`. |
| **3** | Use static `Base64` encoding of `{ "alg": "none" }`. |
| **4** | Note that you do not need to provide a signature, thus the token has only 2 parts, header and payload. |
[Access Control Lists (ACLs)](access-control.html) [Run a service locally](running-locally.html)
- [Akka](../index.html)
- [Developing](index.html)
- [Integrations](integrations/index.html)
- [Message broker integrations](message-brokers.html)
# Message broker integrations
Akka offers built-in message broker integrations for use with the Akka Consumer and Producer component. These built-in integrations are available for Google Cloud Pub/Sub and hosted Kafka services. For other broker technologies, Java client libraries can be used directly to implement publishing of messages.
## Using built-in integrations
For the built-in technologies, Akka decouples the broker configuration from the implementation of the consumer or producer. The topic name is referenced independently of the broker technology, as demonstrated in [Consume from a message broker Topic](consuming-producing.html#consume_topic) and [Producing to a message broker Topic](consuming-producing.html#topic_producing).
All connection details are managed at the Akka project level. For configuration instructions, refer to [Configure message brokers](../operations/projects/message-brokers.html).
The Akka SDK testkit has built-in support for simulating message brokers. See [Testing the Integration](consuming-producing.html#testing) for more details. For running locally with a broker, refer to [running a service with broker support](running-locally.html#_local_broker_support).
## Producing to other broker technologies
Other message broker technologies can be integrated into an Akka service by utilizing their respective client libraries. Additionally, the [Akka libraries Alpakka project](https://doc.akka.io/libraries/alpakka/current) provides Akka-native solutions for integrating various services.
We continuously evaluate additional integrations for potential built-in support in Akka. If you have specific requirements, please contact us at [support@akka.io](mailto:support@akka.io).
## See also
- [Configure message brokers](../operations/projects/message-brokers.html)
- `akka projects config` commands
- [Akka integrations through Alpakka](https://doc.akka.io/libraries/alpakka/current)
[Component and service calls](component-and-service-calls.html) [Streaming](streaming.html)
- [Akka](../index.html)
- [Developing](index.html)
- [Integrations](integrations/index.html)
- [Streaming](streaming.html)
# Streaming
In many cases, Akka takes care of streaming and is using end-to-end backpressure automatically. Akka will also use the event journal or message brokers as durable buffers to decouple producers and consumers. You would typically only have to implement the functions to operate on the stream elements. For example:
- Views are updated asynchronously from a stream of events. You implement the update handler, which is invoked for each event.
- Views can stream the query results, and the receiver demands the pace.
- Consumers process a stream of events. You implement a handler to process each event. Same approach when the source is an entity within the service, another service, or a message broker topic.
- Consumers can produce events to other services or publish to a message broker topic. The downstream consumer or publisher defines the pace.
## Using Akka Streams
Sometimes, the built-in streaming capabilities mentioned above are not enough for what you need, and then you can use Akka Streams. A few examples where Akka Streams would be a good solution:
- Streaming from [Endpoints](http-endpoints.html#_advanced_http_requests_and_responses)
- For each event in a [Consumer](consuming-producing.html) you need to materialize a finite stream to perform some actions in a streaming way instead of composing those actions with `CompletionStage` operations.
- the stream can be run from a [Consumer](consuming-producing.html) event handler
- e.g. for each event, download a file from AWS S3, unzip, for each row send a command to entity
- e.g. for each event, stream file from AWS S3 to Azure Blob
- Streams that are continuously running and are executed per service instance.
- the stream can be started from the [Setup](setup-and-dependency-injection.html#_service_lifecycle)
- e.g. integration with AWS SQS
For running Akka Streams you need a so-called materializer, which can be injected as a constructor parameter of the component, see [dependency injection](setup-and-dependency-injection.html#_dependency_injection).
You find more information about Akka Streams in the [Akka libraries documentation](https://doc.akka.io/libraries/akka-core/current/stream/stream-introduction.html). Many streaming connectors are provided by [Alpakka](https://doc.akka.io/libraries/alpakka/current/).
[Message broker integrations](message-brokers.html) [Retrieval-Augmented Generation (RAG)](rag.html)
- [Akka](../index.html)
- [Developing](index.html)
- [Setup and configuration](setup-and-configuration/index.html)
- [Run a service locally](running-locally.html)
# Run a service locally
Running a service locally is helpful to test and debug. The following sections provide commands for starting and stopping a single service locally.
## Prerequisites
In order to run your service locally, you’ll need to have the following prerequisites:
- Java 21, we recommend [Eclipse Adoptium](https://adoptium.net/marketplace/)
- [Apache Maven](https://maven.apache.org/install.html) version 3.9 or later
- `curl` command-line tool
## Starting your service
As an example, we will use the [Shopping Cart](../getting-started/shopping-cart/build-and-deploy-shopping-cart.html) sample.
To start your service locally, run the following command from the root of your project:
```command
mvn compile exec:java
```
## Invoking your service
After you start the service it will accept invocations on `localhost:9000`. You can use [cURL](https://curl.se/) in another shell to invoke your service.
### Using cURL
Add an item to the shopping cart:
```command
curl -i -XPUT -H "Content-Type: application/json" localhost:9000/carts/123/item -d '
{"productId":"akka-tshirt", "name":"Akka Tshirt", "quantity": 10}'
```
Get cart state:
```command
curl localhost:9000/carts/123
```
## Shutting down the service
Use `Ctrl+c` to shut down the service.
## Run from IntelliJ
The [getting started sample](../getting-started/author-your-first-service.html) and other samples include a run configuration for IntelliJ. In the toolbar you should see:

This is a Maven run configuration for `mvn compile exec:java`. You can also run this with the debugger and set breakpoints in the components.
## Local console
The local console gives you insights of the services that you are running locally.
To run the console you need to install:
- [Akka CLI](../operations/cli/installation.html)
Start the console with the following command from a separate terminal window:
```command
akka local console
```
Open [http://localhost:9889/](http://localhost:9889/)
Start one or more services as described in [Starting your service](about:blank#_starting_your_service) and they will show up in the console. You can restart the services without restarting the console.

## Running a service with persistence enabled
By default, when running locally, persistence is disabled. This means the Akka Runtime will use an in-memory data store for the state of your services. This is useful for local development since it allows you to quickly start and stop your service without having to worry about cleaning the database.
However, if you want to run your service with persistence enabled to keep the data when restarting, you can configure
the service in `application.conf` with `akka.javasdk.dev-mode.persistence.enabled=true` or as a system property when starting the service locally.
```command
mvn compile exec:java -Dakka.javasdk.dev-mode.persistence.enabled=true
```
To clean the local database look for `db.mv.db` file in the root of your project and delete it.
## Running a service with broker support
By default, when running locally, broker support is disabled. When running a service that declares consumers or producers locally, you need to configure the broker with property `akka.javasdk.dev-mode.eventing.support=kafka` in `application.conf` or as a system property when starting the service.
```command
mvn compile exec:java -Dakka.javasdk.dev-mode.eventing.support=kafka
```
For Google PubSub Emulator, use `akka.javasdk.dev-mode.eventing.support=google-pubsub-emulator`.
| | For Kafka, the local Kafka broker is expected to be available on `localhost:9092`. For Google PubSub, the emulator is expected to be available on `localhost:8085`. |
## Running multiple services locally
A typical application is composed of one or more services deployed to the same Akka project. When deployed under the same project, two different services can make [calls to each other](component-and-service-calls.html) or [subscribe to each other’s event streams](consuming-producing.html) by simply using their logical names.
The same can be done on your local machine by configuring the services to run on different ports. The services
will discover each other by name and will be able to interact.
The default port is 9000, and only one of the services can run on the default port. The other service must be configured with another port.
This port is configured in `akka.javasdk.dev-mode.http-port` property in the `src/main/resources/application.conf` file.
```xml
akka.javasdk.dev-mode.http-port=9001
```
With both services configured, we can start them independently by running `mvn compile exec:java` in two separate terminals.
## Running a local cluster
For testing clustering behavior and high availability scenarios, you can run your Akka service as a local cluster with multiple nodes. This allows you to simulate a distributed environment on your local machine.
### Database requirement
To run in cluster mode, you need a shared database that all nodes can connect to. The `local-nodeX.conf` files configure the application to connect to a PostgreSQL database.
Before starting your cluster nodes, you must start a local PostgreSQL database. We recommend using Docker Compose for this purpose. Create a `docker-compose.yml` file with the following configuration:
```yaml
services:
postgres-db:
image: postgres:17
ports:
- 5432:5432
environment:
POSTGRES_USER: postgres
POSTGRES_PASSWORD: postgres
healthcheck:
test: ["CMD", "pg_isready", "-q", "-d", "postgres", "-U", "postgres"]
interval: 5s
retries: 5
start_period: 5s
timeout: 5s
```
Start the database with:
```command
docker compose up -d
```
### Cluster configuration
You can create a local cluster with up to 3 nodes. Each node requires its own configuration file and will run on a different HTTP port.
To start each node, use the following commands in separate terminal windows:
```command
# Node 1 (runs on port 9000)
mvn compile exec:java -Dconfig.resource=local-node1.conf
# Node 2 (runs on port 9001)
mvn compile exec:java -Dconfig.resource=local-node2.conf
# Node 3 (runs on port 9002)
mvn compile exec:java -Dconfig.resource=local-node3.conf
```
### Port assignment
The cluster nodes use sequential port numbering based on your configured HTTP port:
- **Node 1**: Uses the standard HTTP port (default: 9000)
- **Node 2**: Uses standard port + 1 (default: 9001)
- **Node 3**: Uses standard port + 2 (default: 9002)
If you have configured a custom HTTP port in your `application.conf` (for example, 9010), the cluster nodes will use:
- **Node 1**: 9010
- **Node 2**: 9011
- **Node 3**: 9012
This ensures that each node in the cluster has its own unique port while maintaining a predictable numbering scheme.
[JSON Web Tokens (JWT)](auth-with-jwts.html) [AI model provider configuration](model-provider-details.html)
- [Akka](../../index.html)
- [Operating](../index.html)
- [Akka Automated Operations](../akka-platform.html)
- [Organizations](index.html)
- [Regions](regions.html)
# Regions
## Overview
Akka projects are deployed to specific regions, which are tied to the backend infrastructure Akka uses to support projects. Regions:
- Are linked to a particular cloud provider (e.g., GCP, AWS)
- Exist in specific geographic locations (e.g., Europe, North America)
- May have unique performance characteristics
- Can provide varying levels of isolation (e.g., dedicated plans offer isolated regions)
### For Organizations
When an organization is created, it is assigned access to one or more regions. A region must be specified when creating a new project within the organization.
For example, if the organization `myorg` has access to the region `aws-us-east-`2, you would create a project in that region using the following command:
```command
akka project new myproject --organization myorg --region aws-us-east-2
```
### Finding Available Regions
If you’re unsure which regions your organization has access to, there are two options:
1. **Error Prompt**: If you omit the `--region` flag when creating a new project, Akka will inform you of the available regions in the error message. For instance:
```command
$ akka project new myproject --organization myorg
--region is a required flag. The following regions are available: [aws-us-east-2]
```
2. **List Regions Command**: You can list the regions directly using the following command:
```command
akka regions list --organization myorg
```
Example output:
```command
NAME ORGANIZATION
aws-us-east-2 db805ff5-4fbd-4442-ab56-6e6a9a3c200a
```
## Requesting new regions
By default organizations are limited to which regions they can use, particularly for trial organizations. If you would like access to other regions, you can use the **?** in the upper right of the [Akka Console](https://console.akka.io/) to request additional regions via the **Contact support** menu item.
## BYOC and self-hosted regions
Akka also supports Bring Your Own Cloud (BYOC) meaning that we can run regions in your AWS, Azure, or Google Cloud account. These are not available to trial users.
These regions work just like any other regions and are exclusive to your workloads.
To get a BYOC region setup you can [Contact Us](https://www.akka.io/contact).
To learn more about self-hosted Akka regions please To get a BYOC region setup you can [Submit a request](https://www.akka.io/contact) for more information.
## See also
- `akka regions` commands
- `akka project regions` commands
[Manage users](manage-users.html) [Billing](billing.html)
- [Akka](../../index.html)
- [Operating](../index.html)
- [Akka Automated Operations](../akka-platform.html)
- [Organizations](index.html)
- [Billing](billing.html)
# Billing
Akka provides detailed billing information to help organizations monitor and manage the operational costs associated with their projects. Users with the **billing-admin** role can view:
- **Cost breakdown** for each project in the organization.
- **Month-to-date aggregate cost**.
- **Cost forecast** based on current and projected usage across all projects.
Billing data is accessible only to users with the **billing-admin** role. For more information on assigning this role, see the [Assigning the billing-admin Role](about:blank#assigning_billing_admin) section below.
## Billing Interface
For **billing-admin** users, a billing icon appears in the [Akka Console’s](https://console.akka.io/) side navigation. Clicking this icon opens the billing interface, where users can select the billing month and organization to view detailed billing data.
If a user is a billing admin for multiple organizations, they can switch between organizations in the billing UI.

In the billing UI:
- **Month-to-date costs** and a **cost forecast** for the current month are displayed in the upper-right corner.
- Billing data for each project within the selected organization is broken down into the following categories:
- **Network Data Transfer**: Charges for data transfer across all services, measured in GB.
- **Data Operations**: Total read and write operations for all services.
- **Data Persistence**: Total amount of data persisted during the month, measured in GB-Hours.
These are all metered at the project, region, service scope and you can see the totals across organization, project, region, or service as you choose.
For more details on pricing, refer to [Akka Pricing](https://akka.io/pricing#).
## Assigning the billing-admin Role
The organization superuser can assign the billing-admin role in one of two ways:
1. **Invite a User**: Use the following command to invite a user to the organization and assign the billing-admin role:
```command
akka organizations invitations create --organization \
--email --role billing-admin
```
2. **Assign an Existing User**: If the user is already a member, the superuser can assign the billing-admin role directly:
```command
akka organization users add-binding --organization \
--email --role billing-admin
```
For more details on managing users and their roles, see the [Managing organization users](manage-users.html) section.
## See also
- [Managing organization users](manage-users.html)
- [Akka Pricing](https://akka.io/pricing#)
[Regions](regions.html) [Projects](../projects/index.html)
- [Akka](../../index.html)
- [Operating](../index.html)
- [Akka Automated Operations](../akka-platform.html)
- [Organizations](index.html)
# Organizations
An *Organization* in Akka is the root of the management hierarchy and serves as a container for all *Projects* where *Services* are deployed. It provides the context in which users operate, both in the *Akka Console* and *Akka CLI*.
To switch between organizations, you must specify the target organization’s context.
## Key Concepts
- **User Membership**: A user can belong to multiple organizations, but membership does not automatically grant access to the organization’s projects.
- **Regions**: Each organization has access to specific regions. Projects created within the organization are located in one or more of these regions.
- **Billing**: Billing is handled at the organization level, with all costs collected and paid per organization.
- **Role-Based Access**: Membership and project access within an organization are managed through role bindings.
## Details
- **Organization Administrator**: The first user of an organization is an Organization Administrator, who can invite or add users with different roles.
- **Project Ownership**: Each project is owned by a single organization. Users must ensure that their projects are associated with the correct organization.
- **Region Assignment**: Projects created for an organization are assigned to one or more of the organization’s available regions.
## Usage
You can determine which organizations the current user is a member of using the following command:
```command
akka organizations list
```
Example output:
```none
NAME ID ROLES
acme 1a4a9d5d-1234-5678-910a-9c8fb3700da7 superuser
```
| | You can refer to the organization in `akka` commands using either the "friendly name" or the "ID" with the `--organization` flag. See the page on [managing organization users](manage-users.html) to find more, including the use of organization roles. |
## Topics
- [Managing organization users](manage-users.html)
- [Regions](regions.html)
- [Billing](billing.html)
[Akka Automated Operations](../akka-platform.html) [Manage users](manage-users.html)
- [Akka](../../index.html)
- [Operating](../index.html)
- [Akka Automated Operations](../akka-platform.html)
- [Organizations](index.html)
- [Manage users](manage-users.html)
# Managing organization users
Access to an organization is controlled by assigning roles to users. The available roles are: **superuser**, **project-admin**, **billing-admin**, and **member**.
| | Akka supports access management via Single Sign-on (SSO) through the *OpenID Connect* standard. For details, check [OpenID Connect Setup](../../reference/security/oidc-setup.html). |
| Permission | superuser | project-admin | billing-admin | member |
| --- | --- | --- | --- | --- |
| View organization users | ✅ | ✅ | ✅ | ✅ |
| Manage organization users | ✅ | ❌ | ❌ | ❌ |
| Create projects | ✅ | ✅ | ❌ | ❌ |
| Assign regions to projects | ✅ | ✅ | ❌ | ❌ |
| View all projects | ✅ | ❌ | ❌ | ❌ |
| Manage project users | ✅ | ❌ | ❌ | ❌ |
| Delete projects | ✅ | ❌ | ❌ | ❌ |
| All other project/service operations | ❌ | ❌ | ❌ | ❌ |
| View organization billing data | ❌ | ❌ | ✅ | ❌ |
| | Project-level operations are accessed via project-specific roles. A superuser has a subset of project permissions, including the ability to assign roles (including to themselves). When a user creates a project, they are automatically granted admin access to it. (see [granting project roles](../projects/manage-project-access.html)) |
The **member** role allows project admins to add users to their projects without needing to invite them to the organization.
## Listing role bindings
You can list role bindings within an organization using the following command:
```command
akka organization users list-bindings --organization
```
Example output:
```none
ROLE BINDING ID ROLE USERNAME EMAIL NAME
fd21044c-b973-4220-8f65-0f7d317bb23b superuser jane.citizen jane.citizen@example.com Jane Citizen
120b75b6-6b53-4ebb-b23b-2272be974966 member john.smith john.smith@example.com John Smith
```
## Granting a role
| | When using *OpenID Connect* (OIDC), see [OIDC setup](../../reference/security/oidc-setup.html#assigning_organization_level_roles). |
You can grant a role to a user in two ways:
### 1. Invite a User by Email
Send an email invitation with the following command:
```command
akka organizations invitations create --organization \
--email --role
```
The user will receive an email to join the organization. Once accepted, the role binding will be created.
### 2. Add a Role Directly
If the user is already a member, you can assign roles directly:
- By e-mail:
akka organization users add-binding --organization \
--email --role
- By username:
akka organizations users add-binding --organization \
--username --role
## Deleting a role binding
To delete a role binding, first list the users to get the role binding ID. Then, use the following command:
```command
akka organizations users delete-binding --organization \
--id
```
## Managing invitations
View outstanding invitations:
```command
akka organizations invitations list --organization
```
Example output:
```none
EMAIL ROLE
jane.citizen@example.com member
```
Invitations expire after 7 days, but you can cancel them manually:
```command
akka organizations invitations cancel --organization \
--email
```
To resend an invitation, cancel the previous one and reissue the invite.
## See also
- [Managing project users](../projects/manage-project-access.html)
- [OpenID Connect Setup](../../reference/security/oidc-setup.html)
- `akka organizations users` commands
- `akka organizations invitations` commands
[Organizations](index.html) [Regions](regions.html)
- [Akka](../../index.html)
- [Operating](../index.html)
- [Akka Automated Operations](../akka-platform.html)
- [Regions](index.html)
# Regions
Projects in Akka can span across regions with data automatically replicated between all the regions. This increases availability as the regions can either be separate cloud / geographic regions or can be separate logical regions within the same cloud / geographic region. This gives you a high level of control for managing failure domains or fault boundaries in your applications. This is sometimes referred to as blast radius control.
[Regions](../organizations/regions.html) are specified in the project configuration. All services in the project are deployed to all regions. One of the regions will be specified as the primary region. The primary region indicates the source from which region resources (services, routes, secrets, etc.) should be replicated from. By default the primary region is the first one added to the project at deployment time.
Additionally, the primary region also indicates where primary data copies should reside in stateful components like Event Sourced Entities, Key Value Entities or Workflow when using the `pinned-region` primary selection mode.
| | Regions appear at two different scopes in Akka. The first is at the [Organizations](../organizations/index.html) scope. This conveys which regions are available to your organization. The second is at the project scope, which conveys which regions a specific project is bound to. |
To see what regions have been configured for your project, you can run:
```command
akka project regions list
```
## Adding a region to a project
A region can be added to a project if the organization that owns the project has access to that region. To see which regions your organization has access to, run the `akka regions list` command:
```command
akka regions list --organization my-organization
```
To add one of these regions to your project, run:
```command
akka project regions add gcp-us-east1
```
When you deploy a service it will run in all regions of the project. When you add a region to a project the existing services will automatically start in the new region.
| | Project region assignment is restricted to users that have `project-admin` or `superuser` role in the encompassing organization to which the project belongs, as documented in [Manage users](../organizations/manage-users.html). |
### Selecting primary for stateful components
Stateful components like Event Sourced Entities and Workflows can be replicated to other regions. For each stateful component instance there is a primary region, which handles all write requests. Read requests can be served from any region. See [Event Sourced Entity replication](../../sdk/event-sourced-entities.html#_replication), [Key Value Entity replication](../../sdk/key-value-entities.html#_replication) and [Workflow replication](../../sdk/workflows.html#_replication) for more information about read and write requests.
There are two operational choices for deciding where the primary is located:
- **pinned-region** mode - one region is defined as the primary for the project, and all stateful component instances will use that region as primary
- **request-region** mode - the primary is selected by each individual component instance based on where the write requests occur
| | Before changing the primary selection mode, make sure that you understand and follow the steps described in the [How to](about:blank#_how_to). |
The pinned-region mode is used by default. To use request-region mode you need to deploy the service with a [service descriptor](../services/deploy-service.html#apply):
```yaml
name: my-service
service:
image: my-container-uri/container-name:tag-name
replication:
mode: replicated-read
replicatedRead:
primarySelectionMode: request-region
```
When using request-region mode, all regions must be available when the first write request is made to an entity or when switching primary region by handling a write request for an entity in another region than the currently selected primary region.
It is possible to switch between pinned-region and request-region mode, but this should only be done with careful consideration of the consequences. For example, when changing the primary, not all updates may have been replicated and the new primary may not be fully up to date. This is why there is a third mode. This is a read-only mode for all regions, which causes all write requests to be rejected. This can be used as an intermediate stage to ensure that all updates have been replicated before the primary is changed.
To use this read-only mode for all regions you set `primarySelectionMode` to `none` in the service descriptor:
```yaml
name: my-service
service:
image: my-container-uri/container-name:tag-name
replication:
mode: replicated-read
replicatedRead:
primarySelectionMode: none
```
To use the pinned-region primary selection mode again you set `pinned-region` in the service descriptor:
```yaml
name: my-service
service:
image: my-container-uri/container-name:tag-name
replication:
mode: replicated-read
replicatedRead:
primarySelectionMode: pinned-region
```
## Setting the primary region of a project
Changing the primary region of a project is how you control failover or migration in Akka.
| | The primary region of a project is also the region that will be used as primary for stateful components in the pinned-region selection mode. Changing primary should only be done with careful consideration of the consequences, and it is recommended to first change to the read-only mode in all regions. See [Selecting primary for stateful components](about:blank#selecting-primary). |
| | Before changing the primary region, make sure that you understand and follow the steps described in the [How to](about:blank#_how_to). |
To change the primary region of a project run:
```command
akka project regions set-primary gcp-us-east1
```
| | It may be necessary to clear the region cache when running the `akka` command on other machines before this change will be picked up. This can be done by running `akka config clear-cache`. |
## Managing resources in a multi region project
Akka projects are built to span regions. To accomplish this, Akka considers resources in two ways.
### Global resources
In an Akka project, services, routes, secrets, and observability configuration are all *global resources* in that they will deploy to all regions that the project is bound to.
The underlying replication mechanism is that when resources are deployed they first deploy to the primary region. Then a background process will asynchronously copy them to the remain regions. This background synchronization process is eventually consistent.
The `list` and `get` commands for multi-region resources display the sync status for global resources. These commands will show the resource in the primary region by default. You can specify which region you want to get the resource from by passing the `--region` flag. If you want to view the resource in all regions, you can pass the `--all-regions` flag.
### Regional resources
There are certain circumstances where it may not be appropriate to have the same resource synced to all regions. Some common reasons are as follows:
- A route may need to be served from a different hostname in each region.
- A service may require different credentials for a third party service for each region, requiring a different secret to be deployed to each region.
- A different observability configuration may be needed in different regions, such that metrics and logs are aggregated locally in the region.
To deploy a resource as a regional resource, you can specify a `--region` flag to specify which region you want to create the resource in. When updating or deleting the resource, the `--region` flag needs to be passed.
### Switching between global and regional resources
If you have a global resource that you want to change to being a regional resource, this can be done by updating the resource, passing a `--region` flag, and passing the `--force-regional` flag to change it from a global to a regional resource. You must do this on the primary region first, otherwise the resource synchronization process may overwrite your changes.
If you have a regional resource that you want to change to being a global resource, this can be done by updating the resource without specifying a `--region` flag, but passing the `--force-global` flag instead. The command will perform the update in the primary region, and that configuration will be replicated to, and overwrite, the configuration in the rest of the regions.
## How to
There can be several reasons for changing multi-region resources and the primary of stateful components. In this section we describe a few scenarios and provide a checklist of the recommended procedure.
### Observe replication status
You can see throughput, lag, and errors in the replication section in the Control Tower. The replication lag is the time from when the events were created until they were received in the other region. Some errors may be normal, since the connections are sometimes restarted.

### Add a region
1. Follow the instructions in [Adding a region to a project](about:blank#_adding_a_region_to_a_project).
2. You have to [deploy the services](../services/deploy-service.html) again because the container images don’t exist in the container registry of the new region, unless you use a global container registry.
3. You need to [expose the services](../services/invoke-service.html) in the new region.
4. Stateful components are automatically replicated to the new region. This may take some time, and you can see progress in the replication section in the Control Tower. The event consumption lag will at first be high and then close to zero when the replication has been completed.
### Switch from pinned-region to request-region primary selection mode for stateful components
The default primary selection mode for stateful components is the pinned-region mode, as explained in [Selecting primary for stateful components](about:blank#selecting-primary), and you might want to change that to request-region after the first deployment. That section also describes how you change the primary selection mode with a service descriptor.
Component instances that have already been created will continue to have their primary in the original pinned-region primary region, and will switch primary region when write requests occur in the other region(s).
1. First, change to the `none` primary selection mode. This is a read-only mode for all regions and all write requests will be rejected. The reason for changing to this intermediate mode is to make sure that all events have been replicated without creating new events.
2. Wait until the deployment of the `none` primary selection mode has been successfully propagated to all regions. Observe in the Akka Console that the rolling update has been completed in all regions. You can also make sure that replicated events reach zero in the replication section in the Control Tower.
3. Change to `request-region` primary selection mode.
### Switch from request-region to pinned-region primary selection mode for stateful components
pinned-region mode takes precedence over request-region in the sense that a component instance will change its primary to the pinned-region region when there is a new write request to the component instance, and it persists a new event.
[Selecting primary for stateful components](about:blank#selecting-primary) describes how you change the primary selection mode with a service descriptor.
1. First, change to the `none` primary selection mode. This is a read-only mode for all regions and all write requests will be rejected. The reason for changing to this intermediate mode is to make sure that all events have been replicated without creating new events.
2. Wait until the deployment of the `none` primary selection mode has been successfully propagated to all regions. Observe in the Akka Console that the rolling update has been completed in all regions. You can also make sure that replicated events reach zero in the replication section in the Control Tower.
3. Change to `pinned-region` primary selection mode.
### Change the pinned-region primary region for stateful components
You might want to change the pinned-region primary for stateful components if you migrate from one region to another, or need to bring down the primary region for maintenance for a while.
[Selecting primary for stateful components](about:blank#selecting-primary) describes how you change the primary selection mode with a service descriptor.
1. First, change to the `none` primary selection mode. This is a read-only mode for all regions and all write requests will be rejected. The reason for changing to this intermediate mode is to make sure that all events have been replicated without creating new events.
2. Wait until the deployment of the `none` primary selection mode has been successfully propagated to all regions. Observe in the Akka Console that the rolling update has been completed in all regions. You can also make sure that replicated events reach zero in the replication section in the Control Tower.
3. Follow instructions in [Setting the primary region of a project](about:blank#_setting_the_primary_region_of_a_project).
4. Change to `pinned-region` primary selection mode.
### Change primary region for disaster recovery
If a region is failing you might want to fail over to another region that is working.
1. If the failing region is the primary region, follow instructions in [Setting the primary region of a project](about:blank#_setting_the_primary_region_of_a_project) and change the primary to a non-failing region.
2. If you are using `request-region` primary selection you should [Switch from request-region to pinned-region primary selection mode for stateful components](about:blank#_switch_from_request_region_to_pinned_region_primary_selection_mode_for_stateful_components). Depending on how responsive the failing region is this might not be possible to deploy to the failing region, but you should deploy it to the non-failing regions. The reason for this is that otherwise write requests will still be routed to the failing region for component instances that have their primary in the failing region.
3. Be aware that events that were written in the failing region and had not been replicated to other regions before the hard failover will be replicated when the regions are connected again. There are no guarantees regarding the order of these "old" events and any new events written by the new primary, which could lead to conflicting states across regions.
For faster fail over you can consider the alternative of [Fast downing of region for disaster recovery](about:blank#_fast_downing_of_region_for_disaster_recovery), but the drawback is that is more difficult to recover the failed region.
### Fast downing of region for disaster recovery
If the communication with a region is failing or it is completely unresponsive, you might want to take out the failing region, without re-deploying the services in the healthy regions.
1. Use `down-region` from the CLI:
```command
akka project settings down-region gcp-us-east1 aws-us-east-2 --region aws-us-east-2
```
In the above example, `gcp-us-east1` is the failed region that is downed. `aws-us-east-2` is selected as new `pinned-region`, and the CLI command is sent to `aws-us-east-2`.
2. You can send the same command to the failed region, but it will probably not be able to receive it, and that is fine.
```command
akka project settings down-region gcp-us-east1 aws-us-east-2 --region gcp-us-east1
```
3. If you have more than two regions you should send the same command to all other regions using the `--region` flag.
4. You should try to stop the services in the downed region, if they are still running.
```command
akka service pause my-service --region gcp-us-east1
```
[Data migration](../services/data-management.html) [TLS certificates](../tls-certificates.html)
- [Akka](../../index.html)
- [Operating](../index.html)
- [Akka Automated Operations](../akka-platform.html)
- [Integrating with CI/CD tools](index.html)
- [CI/CD with GitHub Actions](github-actions.html)
# CI/CD with GitHub Actions
Use the Akka [setup-akka-cli-action](https://github.com/akka/setup-akka-cli-action) GitHub Action to use GitHub Actions with your Akka project. The action supports commands for installing, authenticating, and invoking the Akka CLI. Releases are tracked [on the GitHub releases page](https://github.com/lightbend/setup-akka-action/releases).
## Prerequisites
To use the Akka GitHub Action, you’ll need to:
- Create a [service token](index.html#create_a_service_token) for your project
- Get the UUID of your project, which can be obtained by running `akka projects list`
## Configure variables
The GitHub Action uses two required variables to authenticate and set the project you want to work on correctly:
- `AKKA_TOKEN`: The Akka service token
- `AKKA_PROJECT_ID`: The project ID for the Akka project you’re using
These variables should be configured as [secrets](https://docs.github.com/en/actions/reference/encrypted-secrets#creating-encrypted-secrets-for-a-repository) for your repository.
## Create a workflow
Follow these steps to create a workflow to invoke the GitHub Action for your project:
1. Create a folder named `.github` at the root of the project folder.
2. Create a file named `config.yml` in the `.github` folder.
3. Open `config.yml` for editing and add:
```yaml
name: akka
on:
push:
branches: [ main ]
jobs:
deploy:
runs-on: ubuntu-latest
steps:
- name: Install Akka CLI
uses: akka/setup-akka-cli-action@v1
with:
token: ${{ secrets.AKKA_TOKEN }} // (1)
project-id: ${{ secrets.AKKA_PROJECT_ID }} // (2)
- name: List services // (3)
run: akka service list // (4)
```
| **1** | The Akka authentication token. |
| **2** | The UUID of the project to which the service belongs. |
| **3** | A unique name for this workflow step. The example lists Akka services. |
| **4** | The command to execute. |
[Integrating with CI/CD tools](index.html) [CLI](../cli/index.html)
- [Akka](../../index.html)
- [Operating](../index.html)
- [Akka Automated Operations](../akka-platform.html)
- [Integrating with CI/CD tools](index.html)
# Integrating with CI/CD tools
Akka development projects can be integrated into a Continuous Integration/Continuous Delivery (CI/CD) process using the Akka CLI. To use the Akka CLI in your CI/CD workflow, you’ll need a service token. A service token is a token tied to a single project, that allows authenticating and performing actions on that project. Service tokens have the following permissions on the project they are created for:
| View project | ✅ |
| Admin project | ❌ |
| View/deploy/update services | ✅ |
| Delete services | ❌ |
| Manage routes | ✅ |
| Manage secrets | ✅ |
| Backoffice functions | ❌ |
## Create a service token
You will need an Akka authentication token to set up any CI/CD process. To create the service token, run the command below:
```command
akka project token create --description "My CI/CD system"
```
The description can be anything, but you should choose a description that will allow you to easily identify that token and what its purpose is.
The output will look similar to:
Token created: cst4.48dcc76ecd5f8a7786267714875c7037395f46aa4206bae1712d89fff37ad123 Copy and paste the token to a safe location. You will not be able to view the token again.
A token may be restricted to certain scopes with the `--scopes` flag. The available scopes are `all`, `container_registry`, `execution`, and `projects`.
## Configure `akka` in a CI/CD process
The basic steps to configure the Akka CLI to run in your CI/CD environment are:
- Configure the `AKKA_TOKEN` and `AKKA_PROJECT` environment variables in your CI/CD environment.
- Install the Akka CLI
The mechanism for configuring the environment variables will be specific to your CI/CD environment. Most cloud based CI/CD services have a mechanism for configuring secrets which get passed by environment variable.
To install the Akka CLI in your CI/CD environment, configure the environment to run the following command using `curl`:
```command
curl -sL https://doc.akka.io/install-cli.sh | bash
```
## Managing service tokens
You can view a list of all the service tokens for a project using the `akka project tokens list` command:
```command
$ akka project tokens list
ID DESCRIPTION SCOPES CREATED
308147ea-9b04-47e4-a308-dc2b4aab0c7d My token [all] 1h0m
```
To revoke a token, use the `akka project token revoke` command, passing the ID of the token you want to revoke:
```command
$ akka project token revoke 308147ea-9b04-47e4-a308-dc2b4aab0c7d
Token revoked
```
[Exporting metrics, logs, and traces](../observability-and-monitoring/observability-exports.html) [CI/CD with GitHub Actions](github-actions.html)
- [Akka](../index.html)
- [Operating](index.html)
# Operating
Akka offers two distinct operational approaches:
- **Self-managed operations**: For teams that prefer to operate Akka on their own infrastructure. This provides full control over runtime and operational details.
- **Akka Automated Operations**: For teams seeking a managed experience with built-in automation, observability, and scalability. Services are deployed either in our [serverless cloud](https://console.akka.io/) or your VPC.
## Feature comparison
| Feature | Self-managed Operations | Akka Automated Operations |
| --- | --- | --- |
| Akka runtime | ✅ | ✅ |
| Akka clustering | ✅ | ✅ |
| Elasticity | ✅ | ✅ |
| Resilience | ✅ | ✅ |
| Durable memory | ✅ | ✅ |
| Akka Orchestration | ✅ | ✅ |
| Akka Agents | ✅ | ✅ |
| Akka Memory | ✅ | ✅ |
| Akka Streaming | ✅ | ✅ |
| Metrics, logs, and traces | ✅ | ✅ |
| Deploy: Bare metal | ✅ | ❌ |
| Deploy: VMs | ✅ | ❌ |
| Deploy: Edge | ✅ | ❌ |
| Deploy: Containers | ✅ | ❌ |
| Deploy: PaaS | ✅ | ❌ |
| Deploy: Serverless | ❌ | ✅ |
| Deploy: Your VPC | ❌ | ✅ |
| Deploy: Your Edge VPC | ❌ | ✅ |
| Auto-elasticity | ❌ | ✅ |
| Multi-tenant services | ❌ | ✅ |
| Multi-region operations | ❌ | ✅ |
| Persistence oversight | ❌ | ✅ |
| Certificate and key rotation | ❌ | ✅ |
| Multi-org access controls | ❌ | ✅ |
| No downtime updates | ❌ | ✅ |
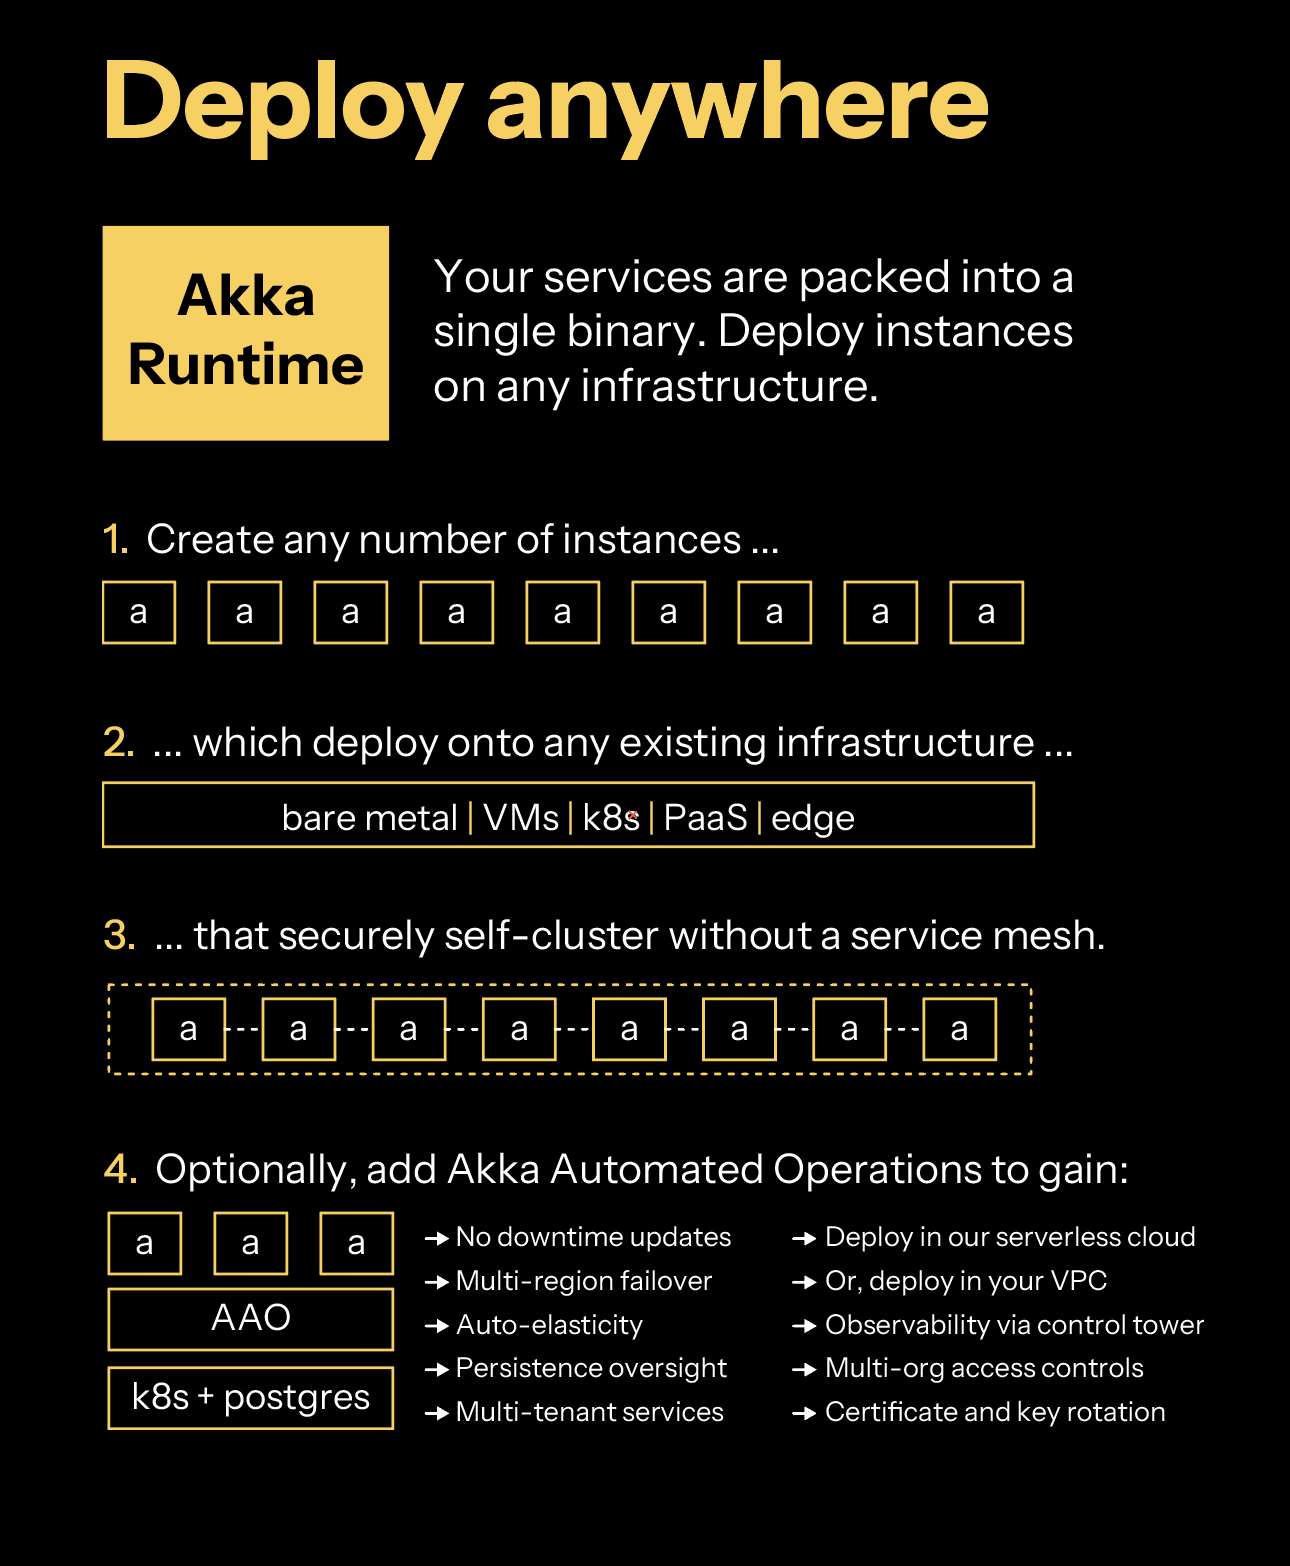
## Service packaging
The services you build with Akka components are composable, which can be combined to design agentic, transactional, analytics, edge, and digital twin systems. You can create services with one component or many.
Your services are packed into a single binary. You create instances of Akka that you can operate on any infrastructure: Platform as a Service (PaaS), Kubernetes, Docker Compose, virtual machines (VMs), bare metal, or edge.
Akka services self-cluster without you needing to install a service mesh. Akka clustering provides elasticity and resilience to your agentic services. In addition to data sharding, data rebalancing, and traffic routing, Akka clustering has built-in support for addressing split brain networking disruptions.
Optionally, you can deploy your agentic services into [Akka Automated Operations](akka-platform.html), which provides a global control plane, multi-tenancy, multi-region operations (for compliance data pinning, failover, and disaster recovery), auto-elasticity based upon traffic load, and persistence management (memory auto-scaling).
[Using an AI coding assistant](../sdk/ai-coding-assistant.html) [Self-managed operations](configuring.html)
- [Akka](../index.html)
- [Operating](index.html)
- [Operator best practices](operator-best-practices.html)
# Operator best practices
## Regionalization precautions
### Primary selection mode
Akka services have two different modes, **pinned-region** or **request-region**, which controls how they perform replication for stateful components. This is outlined in [Selecting primary for stateful components](regions/index.html#selecting-primary). It is important to note that setting this mode has the following implications for your project.
#### Event Sourced Entities
If the service is set to pinned-region primary selection mode Event Sourced Entities will use the primary project region as their primary data region. They will still replicate events, and hence state, to all regions in the project, but will only be writeable in the primary. Akka will route update requests to this region from any endpoint. If the primary selection mode is request-region then each entity instance will use the region where the write requests occur, after synchronizing events from the previous primary region.
#### Workflows
Workflows handle writes, reads and forwarding of requests in the same way as Event Sourced Entities, with the addition that actions are only performed by the primary Workflow instance.
#### Key Value Entities
Static primary selection mode impacts Key Value Entities by specifying one region, the primary region, to be the source for all Key Value Entities in the project. Routing for Key Value Entities automatically forwards all requests from any regional endpoint to this primary region.
### Primary region
Changing primary regions is a serious operation and should be thought out carefully. Ideally you plan this ahead of time and synchronize the regions by allowing the replication lag to drop to zero. You can put the project into a read only mode that will stop any writes from happening if you want to be sure that there will be zero data collisions when you change the primary.
| | At this time [Key Value Entities](../sdk/key-value-entities.html) do not replicate data between regions, but Akka will route all traffic to the correct region for reads and writes. If you change the primary region on a project with Key Value Entities the current state of the entities will be lost. |
### Container registries
Container registries are regional in Akka. If you decide to use [Configure an external container registry](projects/external-container-registries.html) be aware that you should have container registries in or near each of the regions in your project. If you only have your container images in one place and that place becomes unavailable your services will not be able to start new instances.
[Enable CLI command completion](cli/command-completion.html) [Reference](../reference/index.html)
- [Akka](../../index.html)
- [Operating](../index.html)
- [Akka Automated Operations](../akka-platform.html)
- [Projects](index.html)
- [Configure message brokers](message-brokers.html)
# Configure message brokers
Akka eventing integrates with *Google Cloud Pub/Sub* and managed Kafka services such as *Confluent Cloud*, *Amazon Managed Streaming for Apache Kafka (Amazon MSK)*, and *Aiven for Apache Kafka* to enable asynchronous messaging and integrations with other systems.
Message brokers are configured at the Akka project level. A project can have one broker configuration. Akka eventing is independent of the broker technology.
## Broker services
Follow the detailed steps to configure the desired message broker service for use with your Akka project:
- [Google Pub/Sub](broker-google-pubsub.html)
- [Confluent Cloud](broker-confluent.html)
- [Amazon MSK](broker-aws-msk.html)
- [Aiven for Apache Kafka](broker-aiven.html)
We continuously evaluate additional integrations for potential built-in support in Akka. If you have specific requirements, please contact us at [support@akka.io](mailto:support@akka.io).
For running Akka services that integrate with a message broker locally, see [running a service with broker support](../../sdk/running-locally.html#_local_broker_support).
## See also
- `akka projects config` commands
- [Google Cloud Pub/Sub](https://cloud.google.com/pubsub/docs/overview)
- [Confluent Cloud](https://www.confluent.io/confluent-cloud)
- [Amazon MSK](https://aws.amazon.com/msk/)
- [Aiven for Apache Kafka](https://aiven.io/kafka)
[Configure an external container registry](external-container-registries.html) [Google Pub/Sub](broker-google-pubsub.html)
- [Akka](../../index.html)
- [Operating](../index.html)
- [Akka Automated Operations](../akka-platform.html)
- [Projects](index.html)
- [Configure message brokers](message-brokers.html)
- [Aiven for Kafka](broker-aiven.html)
# Using Aiven for Apache Kafka
Akka connects to [Aiven](https://aiven.io/) 's Kafka service via TLS, using a CA certificate provided by Aiven for the service, authenticating using SASL (Simple Authentication and Security Layer) SCRAM.
| | In this guide we use the default `avnadmin` account, but you may want to create a specific service user to use for your Akka service connection. |
## Steps to connect to an Aiven Kafka service
1. Log in to the [Aiven web console](https://console.aiven.io/) and select the Aiven Kafka service Akka should connect to.
2. Enable SASL for your Aiven Kafka (See Aiven’s [Use SASL Authentication with Apache Kafka](https://docs.aiven.io/docs/products/kafka/howto/kafka-sasl-auth))
1. Scroll down the Service overview page to the **Advanced configuration** section.
2. Turn on the setting labelled `kafka_authentication_methods.sasl`, and click **Save advanced configuration**.

3. The connection information at the top of the Service overview page will now offer the ability to connect via SASL or via client certificate. Select SASL in "Authentication Method" to show the right connection details:

4. Download the CA Certificate via the link in the connection information.
3. Ensure you are on the correct Akka project
```command
akka config get-project
```
4. Create an Akka TLS CA secret with the CA certificate for the service (e.g. called `kafka-ca-cert`)
```command
akka secret create tls-ca kafka-ca-cert --cert ./ca.pem
```
5. Copy the CA password from the "Connection Information" and store it in an Akka secret (e.g. called `kafka-secret`)
```command
akka secret create generic kafka-secret --literal pwd=
```
6. Use `akka projects config` to set the broker details. Set the Aiven username and service URI according to the Aiven connection information page.
```command
akka projects config set broker \
--broker-service kafka \
--broker-auth scram-sha-256 \
--broker-user avnadmin \
--broker-password-secret kafka-secret/pwd \
--broker-bootstrap-servers \
--broker-ca-cert-secret kafka-ca-cert
```
The `broker-password-secret` and `broker-ca-cert-secret` refer to the names of the Akka secrets created earlier rather than the actual secret values.
An optional description can be added with the parameter `--description` to provide additional notes about the broker.
7. Contact [support@akka.io](mailto:support@akka.io) to open a port in Akka to reach your Aiven port configured above.
The broker config can be inspected using:
```command
akka projects config get broker
```
## Create a topic
To create a topic, you can either use the Aiven console, or the Aiven CLI.
Browser Instructions from Aiven’s [Creating an Apache Kafka topic](https://docs.aiven.io/docs/products/kafka/howto/create-topic)
1. Open the [Aiven Console](https://console.aiven.io/).
2. In the Services page, click on the Aiven for Apache Kafka® service where you want to crate the topic.
3. Select the Topics tab:
1. In the Add new topic section, enter a name for your topic.
2. In the Advanced configuration you can set the replication factor, number of partitions and other advanced settings. These can be modified later.
4. Click Add Topic on the right hand side of the console.
You can now use the topic to connect with Akka.
Aiven CLI See Aiven’s [Manage Aiven for Apache Kafka topics](https://docs.aiven.io/docs/tools/cli/service/topic#avn-cli-service-topic-create)
```command
avn service topic-create \
\
\
--partitions 3 \
--replication 2
```
You can now use the topic to connect with Akka.
## Delivery characteristics
When your application consumes messages from Kafka, it will try to deliver messages to your service in 'at-least-once' fashion while preserving order.
Kafka partitions are consumed independently. When passing messages to a certain entity or using them to update a view row by specifying the id as the Cloud Event `ce-subject` attribute on the message, the same id must be used to partition the topic to guarantee that the messages are processed in order in the entity or view. Ordering is not guaranteed for messages arriving on different Kafka partitions.
| | Correct partitioning is especially important for topics that stream directly into views and transform the updates: when messages for the same subject id are spread over different transactions, they may read stale data and lose updates. |
To achieve at-least-once delivery, messages that are not acknowledged will be redelivered. This means redeliveries of 'older' messages may arrive behind fresh deliveries of 'newer' messages. The *first* delivery of each message is always in-order, though.
When publishing messages to Kafka from Akka, the `ce-subject` attribute, if present, is used as the Kafka partition key for the message.
## Testing Akka eventing
See [Testing Akka eventing](message-brokers.html#_testing)
## See also
- `akka projects config` commands
[AWS MSK Kafka](broker-aws-msk.html) [Manage secrets](secrets.html)
- [Akka](../../index.html)
- [Operating](../index.html)
- [Akka Automated Operations](../akka-platform.html)
- [Projects](index.html)
# Projects
Akka services are deployed to *Projects* within an [organization](../organizations/index.html).
## Details
- From a security standpoint, projects are isolated from other projects even in the same organization.
- Users are given access to projects on a per-project basis.
- One or more services can be deployed to a project.
- A project is located in one or more regions.
- The services in a project are each packaged as container images for deployment.
## Topics
- [Create a new project](create-project.html)
- [Managing project users](manage-project-access.html)
- [Configure a container registry](container-registries.html)
- [Configure an external container registry](external-container-registries.html)
- [Configure message brokers](message-brokers.html)
- [Aiven for Kafka](broker-aiven.html)
- [AWS MSK Kafka](broker-aws-msk.html)
- [Confluent Cloud](broker-confluent.html)
- [Google Pub/Sub](broker-google-pubsub.html)
- [Manage secrets](secrets.html)
[Billing](../organizations/billing.html) [Create](create-project.html)
- [Akka](../../index.html)
- [Operating](../index.html)
- [Akka Automated Operations](../akka-platform.html)
- [Projects](index.html)
- [Configure a container registry](container-registries.html)
- [Configure an external container registry](external-container-registries.html)
# Configure an external container registry
To use an external container registry with Akka, you need to give Akka permissions to connect to your registry. To add credentials for your container registry to Akka, you can use the Akka CLI or the Akka Console.
| | If the container registry you’re using does not require authentication, you don’t have to add any credentials. Akka will automatically pull the container image using the URL you use to deploy your service. |
External container registries are configured by creating an Akka secret, and then configuring your Akka project to use that secret as docker registry credentials. The secret, and project configuration, are both managed by the `akka docker` command.
There are four parameters you need to specify, depending on the registry you want to connect to:
- Server: The first part of the container image URL. For example, if your image is at `us-central1-docker.pkg.dev/my-project/my-repo/my-image`, the server is `https://us-central1-docker.pkg.dev` (*mandatory*).
- Username: The username (*optional*).
- Email: The email address (*optional*).
- Password: The password (*mandatory*).
Use the `akka docker add-credentials` command.
```command
akka docker add-credentials --docker-server \ // (1)
--docker-username \ // (2)
--docker-email \ // (3)
--docker-password // (4)
```
| **1** | Server |
| **2** | Username |
| **3** | Email |
| **4** | Password |
If you wish to specify the name of the secret that you want to use, that can be done using the `--secret-name` parameter. By default, if not specified, the name of the secret will be `docker-credentials`.
## Updating credentials
The `add-credentials` command can also be used to update existing credentials. Simply ensure that the `--secret-name` argument matches the secret name used when the credentials were added, if it was specified then.
## Listing credentials
To list all container registry credentials for your Akka project, you can use the Akka CLI or the Akka Console. For security purposes, neither the CLI nor the Console will show the password of the configured registry.
Use the `akka docker list-credentials` command:
```command
akka docker list-credentials
```
The results should look something like:
NAME STATUS SERVER EMAIL USERNAME
docker-credentials OK https://us-central1-docker.pkg.dev user@example.com _json_key
## Removing credentials
To remove container registry credentials from your Akka project, you can use the Akka CLI or the Akka Console.
If you specified a `--secret-name` when creating the credentials, this is the name that you must pass to the command to remove. Otherwise, you should pass the default secret name of `docker-credentials`. The name of the secret appears in the `NAME` column when listing credentials.
```command
akka docker delete-credentials docker-credentials
```
Note that this will only remove the credentials from the configuration for the project, it will not delete the underlying secret. To delete the secret as well, run:
```command
akka secrets delete docker-credentials
```
## Supported external registries
### Private container registries
To connect your Akka project to private or self-hosted container registries, the parameters you need are:
- Server: The full URL of your container registry, including the API version (like `https://mycontainerregistry.example.com/v1/`).
- Username: Your username.
- Email: Your email address.
- Password: Your password.
### Docker Hub
To connect your Akka project to Docker Hub, the parameters you need are:
- Server: `https://index.docker.io/v1/`.
- Username: Your Docker Hub username.
- Email: Your Docker Hub email address.
- Password: Your Docker Hub password or Personal Access Token.
When you use the Akka Console, you don’t need to provide the Server URL.
#### Limits on unauthenticated and free usage
Docker has [rate limits](https://docs.docker.com/docker-hub/download-rate-limit/) for unauthenticated and free Docker Hub usage. For unauthenticated users, pull rates are limited based on IP address (anonymous, or unauthenticated, users have a limit of 100 container image pulls per 6 hours per IP address). Akka leverages a limited set of IP addresses to connect to Docker Hub. This means that unauthenticated image pulls might be rate limited. The limit for unauthenticated pulls is shared by all users of Akka.
### Google Artifact Registry
To connect your Akka project to Google Artifact Registry, you’ll need:
- An active Google Cloud Platform account.
- The Artifact Registry API enabled on your Google Cloud project.
- The ID that corresponds with your GCP project.
- The location and name of your Artifact Registry repository.
1. Create the service account.
In the following example the service account is named `akka-docker-reader`. Run the create command in your terminal if you have the GCP shell tools installed. Or, run the command from the browser using Cloud Shell Terminal in the Google Cloud Platform (GCP) project.
```command
gcloud iam service-accounts create akka-docker-reader
```
2. Grant the Artifact Registry Reader role to the service account.
In the following example, replace `` with the GCP project ID.
```command
gcloud projects add-iam-policy-binding \
--member "serviceAccount:akka-docker-reader@.iam.gserviceaccount.com" \
--role "roles/artifactregistry.reader"
```
3. Generate the service account `_json_key`.
```command
gcloud iam service-accounts keys create keyfile.json \
--iam-account akka-docker-reader@.iam.gserviceaccount.com
```
4. Configure your Akka project to use these credentials, by passing the contents of the key file as the password.
In the following example, replace `` with your Artifact Registry location (e.g., `us-central1`, `us-east1`, `europe-west1`).
```command
akka docker add-credentials --docker-server https://-docker.pkg.dev \
--docker-username _json_key \
--docker-email anyemail@example.com \
--docker-password "$(cat keyfile.json)"
```
| | Find detailed configuration instructions in the [Google documentation](https://cloud.google.com/artifact-registry/docs/docker/authentication#json-key). |
### Azure Container Registry
To connect your Akka project to Azure Container Registry (ACR), the parameters you need are:
- Server: `.azurecr.io`.
- Password: The password is based on the " *service principal*." To create a service principal (like `akka-docker-reader`) run the command below.
```command
ACR_REGISTRY_ID=$(az acr show —name akka-registry —query id —output tsv)
```
```command
SP_PASSWD=$(az ad sp create-for-rbac --name http://akka-docker-reader --scopes $ACR_REGISTRY_ID --role acrpull --query password --output tsv)
```
- Username: The username is the application ID of the "service principal." To retrieve the ID, run the command below.
```command
SP_APP_ID=$(az ad sp show —id http://akka-docker-reader —query appId —output tsv)
```
When you use the Akka Console, you only need to fill in the registry name for the Server URL.
## See also
- `akka docker` commands
- `akka container-registry` commands
[Configure a container registry](container-registries.html) [Configure message brokers](message-brokers.html)
- [Akka](../../index.html)
- [Operating](../index.html)
- [Akka Automated Operations](../akka-platform.html)
- [Projects](index.html)
- [Manage users](manage-project-access.html)
# Managing project users
Access to projects is controlled by assigning specific roles to users. The available roles are: **admin**, **developer**, **viewer** and **backoffice**.
| Permission: | admin | developer | viewer | backoffice |
| --- | --- | --- | --- | --- |
| View project | ✅ | ✅ | ✅ | ✅ |
| Admin project | ✅ | ❌ | ❌ | ❌ |
| View services | ✅ | ✅ | ✅ | ❌ |
| Deploy services | ✅ | ✅ | ❌ | ❌ |
| Update services | ✅ | ✅ | ❌ | ❌ |
| Delete services | ✅ | ✅ | ❌ | ❌ |
| View routes | ✅ | ✅ | ✅ | ❌ |
| Manage routes | ✅ | ✅ | ❌ | ❌ |
| View secrets | ✅ | ✅ | ✅ | ❌ |
| Manage secrets | ✅ | ✅ | ❌ | ❌ |
| Backoffice functions | ✅ | ❌ | ❌ | ✅ |
**Backoffice functions** include the ability to:
- View entity event logs and values directly
- Invoke methods on services, even if not exposed to the internet or protected by ACLs
- Manage projections
| | Organization membership is managed separately, see [Managing organization users](../organizations/manage-users.html). |
## Listing role bindings
To list the role bindings in a project, use the following command:
```command
akka roles list-bindings
```
Example output:
```none
ROLE BINDING ID ROLE PRINCIPAL MFA
f3e1ad17-d7be-4432-9ab6-edd475c3aa44 admin John Smith true
311e3752-30f9-43f4-99ef-6cbb4c5f14f3 developer Jane Citizen true
```
| | The Akka CLI can keep a project as context, so you do not need to pass the `--project` flag.
```command
akka config set project
``` |
## Granting a role
| | When using *OpenID Connect* (OIDC), see [OIDC setup](../../reference/security/oidc-setup.html#assigning_project_level_roles). |
You can grant a project role to a user in two ways:
### 1. Invite a user to the project by e-mail
Invite a user to join the project and assign them a role by using the following command:
```command
akka roles invitations invite-user --role
```
The user will receive an email inviting them to join the project. Upon acceptance, the role binding will be created.
### 2. Add a role directly
If the user is already a member of the project, or the project is part of an organization and the user belongs to that organization, you can assign roles directly without sending an invitation.
- By e-mail:
```command
akka roles add-binding --email --role
```
- By username:
```command
akka roles add-binding --username --role
```
## Deleting a project role bindings
To delete a role binding, first list the role bindings to obtain the **role binding ID**.
```command
akka roles list-bindings
```
Example output:
```none
ROLE BINDING ID ROLE PRINCIPAL MFA
f3e1ad17-d7be-4432-9ab6-edd475c3aa44 admin John Smith true
311e3752-30f9-43f4-99ef-6cbb4c5f14f3 developer Jane Citizen true
```
Pass the **role binding ID** to the following command:
```command
akka roles delete-binding
```
## Managing invitations
To view outstanding invitations, use the following command:
```command
akka roles invitations list
```
Example output:
```none
EMAIL ROLE
jane.citizen@example.com admin
```
Invitations will automatically expire after 7 days. You can manually delete an invitation with the following command:
```command
akka roles invitations delete
```
To resend an invitation, first delete the expired invitation and then issue a new one.
## See also
- [Managing organization users](../organizations/manage-users.html)
- `akka roles` commands
[Create](create-project.html) [Configure a container registry](container-registries.html)
- [Akka](../../index.html)
- [Operating](../index.html)
- [Akka Automated Operations](../akka-platform.html)
- [Projects](index.html)
- [Create](create-project.html)
# Create a new project
When creating a new project in Akka, you’ll need to provide a **name**, an optional **description**, and select a **region**. The region determines both the cloud provider and geographical location where your project will be hosted.
## Project names
- Use a short but meaningful name that reflects the purpose of the project.
- Keep descriptions short and clear to help collaborators understand the project’s context.
Project Naming Requirements:
- Maximum 63 characters
- Can include: lowercase letters, numbers, hyphens (`-`)
- Must not: start or end with hyphens
- Cannot include: underscores, spaces, or non-alphanumeric characters
## Selecting a region
Regions define the cloud provider and geographical location where your project will be deployed. Consider proximity to your users for lower latency and any compliance or performance requirements when selecting a region.
## How to create a new project
To create a new project, use either the Akka CLI or the [Akka Console](https://console.akka.io/):
CLI
1. If you haven’t done so yet, [install the Akka CLI](../cli/installation.html) and log into your account:
```command
akka auth login
```
2. To list available regions and organizations, use the following command:
```command
akka regions list --organization=
```
3. Create a project by substituting your project name and placing a short project description name in quotes, followed by the `region` flag and the `organization` flag.
```command
akka projects new "" --region= --organization=
```
For example:
```command
akka projects new my-akka-project "My Akka Project" --region=gcp-us-east1 --organization=my-organization
```
Example output:
```none
NAME DESCRIPTION ID OWNER REGION
my-akka-project "My .. xxxxxxxx-xxxx-xxxx-xxxx-xxxxxxxxxxxx id:"xxxxxxxx-xxxx-xxxx-xxxx-xxxxxxxxxxxx" gcp-us-east1
'my-akka-project' is now the currently active project.
```
UI
1. Log in to [Akka Console](https://console.akka.io/)
2. Navigate to the [Projects](https://console.akka.io/projects) section.
3. Click **Create a project** and fill in the required fields, including name, description, region, and organization.

4. Review and click **Create Project** to finalize your project.
The new project will show as a card in the **Project** section.
You may now continue and [deploy a Service](../services/deploy-service.html) in the new Project.
## See also
- [Deploy and manage services](../services/deploy-service.html)
- `akka projects new` commands
- `akka projects get` commands
[Projects](index.html) [Manage users](manage-project-access.html)
- [Akka](../../index.html)
- [Operating](../index.html)
- [Akka Automated Operations](../akka-platform.html)
- [Projects](index.html)
- [Configure message brokers](message-brokers.html)
- [Google Pub/Sub](broker-google-pubsub.html)
# Using Google Cloud Pub/Sub as message broker
To configure access to your Google Cloud Pub/Sub broker for your Akka project, you need to create a Google service account with access to your Google Cloud Pub/Sub broker and provide it to Akka.
Details on doing this can be found in the [Google documentation](https://cloud.google.com/iam/docs/creating-managing-service-accounts). We provide simplified steps below.
The service account should allow for the `roles/pubsub.editor` [role](https://cloud.google.com/pubsub/docs/access-control#roles).
## Setting up the service account
To set up a service account and generate the key, follow these steps:
1. Navigate to [https://console.cloud.google.com/](https://console.cloud.google.com/).
2. From the blue bar, click the dropdown menu next to **Google Cloud Platform**.
3. Click **New Project** to create a project and save the ``, which you will need later.
4. Enter the following `gcloud` command to set up the `gcloud` environment:
```command
gcloud auth login
gcloud projects list
gcloud config set project
```
5. Enter the following command to create the service account. The example uses the name `akka-broker`, but you can use any name.
```command
gcloud iam service-accounts create akka-broker
```
6. Enter the following commands to grant the GCP Pub/Sub editor role to the service account. Substitute your project ID for ``.
```command
gcloud projects add-iam-policy-binding \
--member "serviceAccount:akka-broker@.iam.gserviceaccount.com" \
--role "roles/pubsub.editor"
```
7. Generate a key file for your service account:
```command
gcloud iam service-accounts keys create keyfile.json \
--iam-account akka-broker@.iam.gserviceaccount.com
```
Now you have a service account key file with which to configure Akka to use your Google Cloud Pub/Sub broker. You can add the key file using either the Akka Console or the Akka CLI.
Browser
1. Open the project in the Akka Console.
2. Select **Integrations** from the left-hand navigation menu.
3. Click **+** for the Google Cloud Pub/Sub integration option.
4. Copy the contents of `keyfile.json` into the editor and, click **Apply**.
The project is now configured to use Google Pub/Sub as the message broker.
CLI
```command
akka projects config set broker \
--broker-service google-pubsub \
--gcp-key-file keyfile.json \
--description "Google Pub/Sub in "
```
The project is now configured to use Google Pub/Sub as the message broker.
### Create a topic
To create a topic, you can either use the Google Cloud Console, or the Google Cloud CLI.
Browser
1. Open the Google Cloud Console.
2. Go to the Pub/Sub product page.
3. Click **CREATE TOPIC** on the top of the screen.
4. Fill in the Topic ID field and choose any other options you need.
5. Click **CREATE TOPIC** in the modal dialog.
You can now use the topic to connect with Akka
Google Cloud CLI
```command
gcloud pubsub topics create TOPIC_ID
```
You can now use the topic to connect with Akka
## Delivery characteristics
When your application consumes messages from Google Pub/Sub, it will try to deliver messages to your service in 'at-least-once' fashion while preserving order.
- the GCP 'Subscription' has the 'Message ordering' flag enabled (this is the case by default for the subscriptions created by Akka)
- the code that acts as a publisher has 'message ordering' enabled (if needed on this client SDK)
- an ordering key is [provided for each message](https://cloud.google.com/pubsub/docs/publisher#using-ordering-keys)
When passing messages to a certain entity or using them to update a view row by specifying the id as the Cloud Event `ce-subject` attribute on the message, the same id must be used for the Google Pub/Sub ordering key to guarantee that the messages are processed in order by the entity or view.
| | Correct ordering is especially important for topics that stream directly into views using the `transform_update` option: when messages for the same subject id are spread over different ordering keys (or do not have ordering keys), they may read stale data and lose updates. |
To achieve at-least-once delivery, messages that are not acknowledged before the [Ack deadline](https://cloud.google.com/pubsub/docs/subscriber#subscription-workflow) will be redelivered. This means redeliveries of 'older' messages may arrive behind fresh deliveries of 'newer' messages.
When publishing messages to Google Pub/Sub from Akka, the `ce-subject` attribute, if present, is used as the ordering key for the message.
## Testing Akka eventing
See [Testing Akka eventing](message-brokers.html#_testing).
## See also
- `akka projects config` commands
[Configure message brokers](message-brokers.html) [Confluent Cloud](broker-confluent.html)
- [Akka](../../index.html)
- [Operating](../index.html)
- [Akka Automated Operations](../akka-platform.html)
- [Projects](index.html)
- [Configure message brokers](message-brokers.html)
- [Confluent Cloud](broker-confluent.html)
# Using Confluent Cloud as Kafka service
Akka connects to [Confluent Cloud](https://confluent.cloud/) Kafka services via TLS, authenticating using SASL (Simple Authentication and Security Layer) PLAIN.
## Steps to connect to a Confluent Cloud Kafka broker
Take the following steps to configure access to your Confluent Cloud Kafka broker for your Akka project.
1. Log in to [Confluent Cloud](https://confluent.cloud/) and select the cluster Akka should connect to. Create a new cluster if you don’t have one already.
2. Create an API key for authentication
1. Select "API Keys"

2. Choose the API key scope for development use, or proper setup with ACLs. The API key’s "Key" is the username, the "Secret" acts as password.
3. When the API key was created, your browser downloads an `api-key-… .txt` file with the API key details.

3. Ensure you are on the correct Akka project
```command
akka config get-project
```
4. Copy the API secret and store it in an Akka secret (e.g. called `confluent-api-secret`)
```command
akka secret create generic confluent-api-secret --literal secret=
```
5. Select "Cluster Settings" and copy the bootstrap server address shown in the "Endpoints" box.
6. Use `akka projects config` to set the broker details. Set the username using the provided API key’s "Key" and service URI according to the connection information.
```command
akka projects config set broker \
--broker-service kafka \
--broker-auth plain \
--broker-user \
--broker-password-secret confluent-api-secret/secret \
--broker-bootstrap-servers \
```
The `broker-password-secret` refer to the name of the Akka secret created earlier rather than the actual API key secret.
An optional description can be added with the parameter `--description` to provide additional notes about the broker.
The broker config can be inspected using:
```command
akka projects config get broker
```
## Create a topic
To create a topic, you can either use the Confluent Cloud user interface, or the [Confluent CLI](https://docs.confluent.io/confluent-cli/current/overview.html).
Browser
1. Open [Confluent Cloud](https://confluent.cloud/).
2. Go to your cluster
3. Go to the Topics page
4. Use the Add Topic button
5. Fill in the topic name, select the number of partitions, and use the Create with defaults button
You can now use the topic to connect with Akka.
Confluent Cloud CLI
```command
confluent kafka topic create \
\
--partitions 3 \
--replication 2
```
You can now use the topic to connect with Akka.
## Delivery characteristics
When your application consumes messages from Kafka, it will try to deliver messages to your service in 'at-least-once' fashion while preserving order.
Kafka partitions are consumed independently. When passing messages to a certain entity or using them to update a view row by specifying the id as the Cloud Event `ce-subject` attribute on the message, the same id must be used to partition the topic to guarantee that the messages are processed in order in the entity or view. Ordering is not guaranteed for messages arriving on different Kafka partitions.
| | Correct partitioning is especially important for topics that stream directly into views and transform the updates: when messages for the same subject id are spread over different transactions, they may read stale data and lose updates. |
To achieve at-least-once delivery, messages that are not acknowledged will be redelivered. This means redeliveries of 'older' messages may arrive behind fresh deliveries of 'newer' messages. The *first* delivery of each message is always in-order, though.
When publishing messages to Kafka from Akka, the `ce-subject` attribute, if present, is used as the Kafka partition key for the message.
## Testing Akka eventing
See [Testing Akka eventing](message-brokers.html#_testing)
## See also
- `akka projects config` commands
[Google Pub/Sub](broker-google-pubsub.html) [AWS MSK Kafka](broker-aws-msk.html)
- [Akka](../../index.html)
- [Operating](../index.html)
- [Akka Automated Operations](../akka-platform.html)
- [Projects](index.html)
- [Configure message brokers](message-brokers.html)
- [AWS MSK Kafka](broker-aws-msk.html)
# Using AWS MSK as Kafka service
Akka connects to [Amazon MSK](https://aws.amazon.com/msk/) clusters via TLS, authenticating using SASL (Simple Authentication and Security Layer) SCRAM.
Prerequisites not covered in detail by this guide:
1. The MSK instance must be provisioned, serverless MSK does not support SASL.
2. The MSK cluster must be set up with [TLS for client broker connections and SASL/SCRAM for authentication](https://docs.aws.amazon.com/msk/latest/developerguide/msk-password.html) with a user and password to use for authenticating your Akka service
1. The user and password is stored in a secret
2. The secret must be encrypted with a specific key, MSK cannot use the default MKS encryption key
3. The provisioned cluster must be set up for [public access](https://docs.aws.amazon.com/msk/latest/developerguide/public-access.html)
1. Creating relevant ACLs for the user to access the topics in your MSK cluster
2. Disabling `allow.everyone.if.no.acl.found` in the MSK cluster config
4. Creating topics used by your Akka service
## Steps to connect to an AWS Kafka broker
Take the following steps to configure access to your AWS Kafka broker for your Akka project.
1. Ensure you are on the correct Akka project
```command
akka config get-project
```
2. Store the password for your user in an Akka secret:
```command
akka secret create generic aws-msk-secret --literal pwd=
```
3. Get the bootstrap brokers for your cluster, they can be found by selecting the cluster and clicking "View client information."
There is a copy button at the top of "Public endpoint" that will copy a correctly formatted string with the bootstrap brokers. [See AWS docs for other ways to inspect the bootstrap brokers](https://docs.aws.amazon.com/msk/latest/developerguide/msk-get-bootstrap-brokers.html).
4. Use `akka projects config` to set the broker details. Set the MSK SASL username you have prepared and the bootstrap servers.
```command
akka projects config set broker \
--broker-service kafka \
--broker-auth scram-sha-512 \
--broker-user \
--broker-password-secret aws-msk-secret/pwd \
--broker-bootstrap-servers \
```
The `broker-password-secret` refer to the name of the Akka secret created earlier rather than the actual password string.
An optional description can be added with the parameter `--description` to provide additional notes about the broker.
The broker config can be inspected using:
```command
akka projects config get broker
```
### Custom key pair
If you are using a custom key pair for TLS connections to your MSK cluster, instead of the default AWS provided key pair, you will need to define a secret with the CA certificate:
```command
akka secret create tls-ca kafka-ca-cert --cert ./ca.pem
```
And then pass the name of that secret for `--broker-ca-cert-secret` when setting the broker up:
```command
akka projects config set broker \
--broker-service kafka \
--broker-auth scram-sha-512 \
--broker-user \
--broker-password-secret aws-msk-secret/pwd \
--broker-ca-cert-secret kafka-ca-cert
--broker-bootstrap-servers \
```
## Delivery characteristics
When your application consumes messages from Kafka, it will try to deliver messages to your service in 'at-least-once' fashion while preserving order.
Kafka partitions are consumed independently. When passing messages to a certain entity or using them to update a view row by specifying the id as the Cloud Event `ce-subject` attribute on the message, the same id must be used to partition the topic to guarantee that the messages are processed in order in the entity or view. Ordering is not guaranteed for messages arriving on different Kafka partitions.
| | Correct partitioning is especially important for topics that stream directly into views and transform the updates: when messages for the same subject id are spread over different transactions, they may read stale data and lose updates. |
To achieve at-least-once delivery, messages that are not acknowledged will be redelivered. This means redeliveries of 'older' messages may arrive behind fresh deliveries of 'newer' messages. The *first* delivery of each message is always in-order, though.
When publishing messages to Kafka from Akka, the `ce-subject` attribute, if present, is used as the Kafka partition key for the message.
## Testing Akka eventing
See [Testing Akka eventing](message-brokers.html#_testing)
## See also
- `akka projects config` commands
[Confluent Cloud](broker-confluent.html) [Aiven for Kafka](broker-aiven.html)
- [Akka](../../index.html)
- [Operating](../index.html)
- [Akka Automated Operations](../akka-platform.html)
- [Projects](index.html)
- [Configure a container registry](container-registries.html)
# Configure a container registry
Akka deploys services as container images. These images, which include your Akka services and any dependencies, are produced using Maven (i.e., `mvn install`) and sent to Akka for deployment. Before deployment, the container must be made accessible in a container registry.
Akka provides a built-in *Akka Container Registry (ACR)* which is pre-configured for your convenience. Alternatively, [external container registries](external-container-registries.html) are also supported for Akka.
## Akka Container Registry
The *Akka Container Registry (ACR)* is available to all Akka users and supported across all Akka regions, allowing for easy, integrated deployments without dependency on external registry connectivity. Authentication is built-in, so deployments, restarts, and scaling operate independently of external networks.
## Prerequisites
Ensure the following prerequisites are met before continuing:
- The current user must be logged into Akka.
- Docker must be installed and accessible for the current user.
To verify your Akka login status, run `akka auth current-login`. (If not logged in, use `akka auth login`.)
```command
> akka auth current-login
ba6f49b0-c4e1-cccc-ffff-30053f652c42 user test@akka.io true CLI login from machine.localdomain(127.0.0.1) 3d21h
```
Confirm that you have Docker installed by checking the version:
```command
> docker --version
Docker version 27.3.1, build ce1223035a
```
## Configuring ACR authentication
The *Akka Container Registry* uses an access token generated via Akka for authentication. When you initiate a `docker push`, an intermediate credential helper retrieves this token using the Akka CLI. Configure the Docker credentials helper as follows:
```command
> akka auth container-registry configure
This operation will update your '.docker/config.json' file. Do you want to continue?
Use the arrow keys to navigate: ↓ ↑ → ←
? >:
▸ No
Yes
```
Select "Yes" to proceed.
Once configuration completes, it will display the ACR hostnames for all available regions:
```none
Docker configuration file successfully updated.
Available Akka Container Registry hosts per region:
PROVIDER CLOUD REGION ORGANIZATION ORGANIZATION_ID AKKA CONTAINER REGISTRY
gcp us-east1 gcp-us-east1 PUBLIC NONE acr.us-east-1.akka.io
gcp us-east1 gcp-us-east1 acme cde1044c-b973-4220-8f65-0f7d317bb458 acr.us-east-1.akka.io
```
The Akka Container Registry is now ready for use.
See [deploy and manage services](../services/deploy-service.html) for further details on how to deploy a service.
## See also
- `akka container-registry` commands
[Manage users](manage-project-access.html) [Configure an external container registry](external-container-registries.html)
- [Akka](../../index.html)
- [Operating](../index.html)
- [Akka Automated Operations](../akka-platform.html)
- [Projects](index.html)
- [Manage secrets](secrets.html)
# Manage secrets
Akka provides secret management for each project. Secrets are for passwords, login credentials, keys, etc. You can provide secrets to your services through environment variables. When you display the service information, the content of the secrets will not display.
## Manage secrets in a project
### Adding secrets
To add secrets to your Akka project, you can use the Akka CLI.
| | To mark your project as the target of subsequent commands, use the following command:
```command
akka config set project sample-project
``` |
When you create a secret, it contains:
- secret name
- contents (as key/value pairs)
CLI Use the `akka secret create` command.
```command
akka secret create generic db-secret \ // (1)
--literal username=admin \
--literal pwd=my_passwd // (2)
```
| **1** | Secret name |
| **2** | Contents (as key/value pairs) You can also set a secret from a file, using the `--from-file` argument:
```command
akka secret create generic some-key \
--from-file key=path/to/my-key-file
``` |
### Updating secrets
CLI Secrets can be updated using the `akka secret update` command, in the same way as the `akka secret create` command:
```command
akka secret update generic db-secret \
--literal username=new-username \
--literal pwd=new-password
```
### Listing secrets
To list the secrets in your Akka project, you can use the Akka CLI or the Akka Console. For security purposes, they only show content keys. Neither the CLI nor the Console will show content values of a secret.
CLI Use the `akka secret list` command:
```command
akka secret list
```
The results should look something like:
NAME TYPE KEYS
db-secret generic username,pwd Console
1. Sign in to your Akka account at: [https://console.akka.io](https://console.akka.io/)
2. Click the project for which you want to see the secrets.
3. Using the left pane or top navigation bar, click **Secrets** to open the Secrets page which lists the secrets.
### Display secret contents
To display secret contents for your Akka project, you can use the Akka CLI or the Akka Console. For security purposes, they only show content keys. Neither the CLI nor the Console will show content values of a secret.
CLI Use the `akka secret get` command:
```command
akka secret get
```
The results should look something like:
NAME: db-secret
KEYS:
username
pwd Console
1. Sign in to your Akka account at: [https://console.akka.io](https://console.akka.io/)
2. Click the project for which you want to see the secrets.
3. Using the left pane or top navigation bar, click **Secrets** to open the Secrets page which lists the secrets.
4. Click the secret you wish to review.
### Removing secrets
To remove the secret for your Akka project, you can use the Akka CLI.
CLI `akka secret delete` command:
```command
akka secret delete
```
## Set secrets as environment variables for a service
To set secrets as environment variables for a service, you can use the Akka CLI.
CLI `akka service deploy` command with parameter `--secret-env`:
```command
akka service deploy \
--secret-env MY_VAR1=db-secret/username,MY_VAR2=db-secret/pwd // (1)
```
| **1** | The value for an environment variable that refers to a secret is of the form `/` |
## Display secrets as environment variables for a service
To set secrets as environment variables for a service, you can use the Akka CLI or the Akka Console.
CLI `akka service get`:
```command
akka service get
```
The results should look something like:
Service:
Created: 24s
Description:
Status: Running
Image:
Env variables:
MY_VAR1=db-secret/username
MY_VAR2=db-secret/pwd
Generation: 1
Store: Console
1. Sign in to your Akka account at: [https://console.akka.io](https://console.akka.io/)
2. Click the project to which your service belongs.
3. Click the service.
4. In the `Properties: ` panel, you should see the environment variables.
## See also
- `akka secrets` commands
[Aiven for Kafka](broker-aiven.html) [Services](../services/index.html)
- [Akka](../../index.html)
- [Operating](../index.html)
- [Akka Automated Operations](../akka-platform.html)
- [CLI](index.html)
- [Using the Akka CLI](using-cli.html)
# Using the Akka CLI
The Akka command-line interface (CLI) complements the browser-based [Akka Console](https://console.akka.io/) user interface (UI), allowing you to perform deployment and configuration operations directly from the command line. This page provides an overview of common commands.
For a full reference of all available commands, see the [reference](../../reference/cli/akka-cli/index.html) page.
| | Check regularly to ensure you have the latest version of the `akka` CLI. You can check the installed version by running:
```shell
akka version
```
For instructions on updating, see [installing and updating](installation.html). |
## Basic CLI Usage
The general structure of an Akka CLI command is:
```shell
akka [sub-command] [parameters] --[flags]
```
Flags, which modify command behavior, are always preceded by `--`.
## Logging In
Before using the `akka` CLI, you must authenticate with your Akka account. To initiate the login process, run:
```shell
akka auth login
```
This command opens the Akka console login screen in your default web browser. The CLI will display `Waiting for UI login…` while you authenticate. Once authorization is complete, the CLI returns to the command prompt.
Upon successful authentication:
- If you have one project, it is automatically set as the `current` project.
- If no projects exist, you’ll need to create one and set it manually.
- If you have multiple projects, you’ll need to specify the target project manually (see below).
To set your current project:
```shell
akka config set project my-project
```
For more authentication options:
```shell
akka auth -h
```
You can also refer to the [auth](../../reference/cli/akka-cli/akka_auth.html) page.
### Handling Proxies
In corporate environments with HTTP proxy servers that don’t support HTTP/2, you may encounter issues since the `akka` CLI uses gRPC. To bypass these limitations, you can configure the CLI to use grpc-web, which works over HTTP/1.1 and HTTP/2.
Log in with grpc-web enabled:
```shell
akka auth login --use-grpc-web
```
If you’re already logged in but need to switch to grpc-web, configure it with:
```shell
akka config set api-server-use-grpc-web true
```
## Managing Projects
The Akka CLI allows you to create, list, and configure projects.
For more commands, see the [projects](../../reference/cli/akka-cli/akka_projects.html) page.
### Creating a New Project
To create a new project within your organization:
```shell
akka projects new sample-project "An example project in Akka"
```
This creates a project named `sample-project` with the description `"An example project in Akka"`.
To set this new project as your current project:
```shell
akka config set project sample-project
```
### Listing Projects
To list all projects accessible within your organization:
```shell
akka projects list
```
The CLI displays a list of available projects, with the current project marked by an asterisk (`*`).
## Managing Container Registry Credentials
To allow Akka services to pull images from private Docker registries, add container registry credentials with the following command:
```shell
akka docker add-credentials \
--docker-server https://mydockerregistry.com \
--docker-username myself \
--docker-password secret
```
Required flags:
* `--docker-server` (e.g., `https://mydockerregistry.com`)
* `--docker-username` (your Docker username)
* `--docker-password` (your Docker password)
TODO: For more details, see `akka docker -h` or visit [docker](../../reference/cli/akka-cli/akka_docker.html) page.
| | For more information about using the Akka Container Registry (ACR) or external container registries, see [Configure a container registry](../projects/container-registries.html). |
## Managing Services
The `akka services` commands allow you to interact with services in your current Akka project.
### Listing Services
To list all services in the current project:
```shell
akka services list
```
The CLI displays a summary of all services, including their names and statuses.
### Deploying a Service
To deploy a service using a Docker image, run:
```shell
akka services deploy my-service my-container-uri/container-name:tag-name
```
Ensure you’ve set up your container registry credentials before deploying. For more details, see [container registry](../projects/container-registries.html) page.
### Exposing a route for inbound traffic
To expose a service for inbound traffic:
```shell
akka services expose my-service --enable-cors
```
This command creates a route for the specified service, with the option to enable HTTP CORS using the `--enable-cors` flag.
### Viewing Service Logs
To view logs from a specific service:
```shell
akka services logs my-service --follow
```
This command streams the logging output for the service.
### Viewing Service Details
To view detailed information about a service:
```shell
akka services get my-service
```
This command returns a detailed description of the service’s configuration and status.
### Inspecting Service Components
Akka services consist of one or more components. You can list and inspect these components using the following commands.
To list the components of a service:
```shell
akka services components my-service list
```
The CLI will display a list of components for the specified service:
```shell
NAME TYPE TYPE ID
com.example.api.ShoppingCartController HttpEndpoint
com.example.api.ShoppingCartEntity KeyValueEntity shopping-cart
```
This table shows the component names, their types, and any associated type IDs.
| | If you want to view the events from an event sourced entity you can use the `akka service components list-events` command.
More information about this command in [components](../../reference/cli/akka-cli/akka_services_components_list-events.html) page. |
## Related documentation
- [Enable CLI command completion](command-completion.html)
- [CLI command reference](../../reference/cli/akka-cli/index.html)
[Install the Akka CLI](installation.html) [Enable CLI command completion](command-completion.html)
- [Akka](../../index.html)
- [Operating](../index.html)
- [Akka Automated Operations](../akka-platform.html)
- [CLI](index.html)
# CLI
Using the Akka CLI, you control all aspects of your Akka account from your command line. With it, you create and deploy new services, stream logs, and invite new developers to join your projects.
## Installation
The Akka CLI, `akka` enables you to interact with Akka projects. To install it, follow these steps: [Install the Akka CLI](installation.html)
## Using the CLI
The Akka command-line interface (CLI) complements the browser-based [Akka Console](https://console.akka.io/) user interface (UI), allowing you to perform deployment and configuration operations directly from the command line.
This page provides an overview of common commands: [Using the Akka CLI](using-cli.html)
## Command Completion
Completion allows you to hit [TAB] on a partially entered `akka` command and have the shell complete the command, subcommand or flag for you.
To enable it, follow these steps: [Enable CLI command completion](command-completion.html)
[CI/CD with GitHub Actions](../integrating-cicd/github-actions.html) [Install the Akka CLI](installation.html)
- [Akka](../../index.html)
- [Operating](../index.html)
- [Akka Automated Operations](../akka-platform.html)
- [CLI](index.html)
- [Enable CLI command completion](command-completion.html)
# Enable CLI command completion
Completion allows you to hit [TAB] on a partially entered `akka` command and have the shell complete the command, subcommand or flag for you.
bash To load completion in the current bash shell run:
```bash
source <(akka completion)
```
Configure bash to load `akka` completions for each session by adding the following line to your `~/.bashrc` or `~/.profile` file:
```bash
# add to ~/.bashrc or ~/.profile
source <(akka completion)
```
| | Using bash completions with `akka` requires you have bash completions enabled to begin with.
Enable it in your `~/.bashrc` or `~/.profile` file with the following lines:
```bash
if [ -f /etc/bash_completion ]; then
source /etc/bash_completion
fi
```
For definitive details on setting up your shell with auto-completion, see the shell documentation. |
zsh (e.g. macOS) To set up `zsh` shell completion run:
```zsh
akka completion zsh > "${fpath[1]}/_akka"
compinit
```
| | If shell completion is not already enabled in your environment execute the following:
```zsh
echo "autoload -U compinit; compinit" >> ~/.zshrc
``` |
fish To set up fish shell completion run:
```fish
akka completion fish > ~/.config/fish/completions/akka.fish
source ~/.config/fish/completions/akka.fish
```
PowerShell To set up shell completion for PowerShell run:
```powershell
akka completion powershell | Out-String | Invoke-Expression
```
## Related documentation
- [CLI command reference](../../reference/cli/akka-cli/index.html)
[Using the Akka CLI](using-cli.html) [Operator best practices](../operator-best-practices.html)
- [Akka](../../index.html)
- [Operating](../index.html)
- [Akka Automated Operations](../akka-platform.html)
- [CLI](index.html)
- [Install the Akka CLI](installation.html)
# Install the Akka CLI
The Akka CLI, `akka` enables you to interact with Akka projects. To install it, follow these steps:
Linux Download and install the latest version of `akka`:
```bash
curl -sL https://doc.akka.io/install-cli.sh | bash
```
If that fails due to permission issues, use:
```bash
curl -sL https://doc.akka.io/install-cli.sh | bash -s -- --prefix /tmp && \
sudo mv /tmp/akka /usr/local/bin/akka
```
You can pass options to the installer script with `-s --` e.g.:
```bash
curl -sL https://doc.akka.io/install-cli.sh | bash -s -- --prefix=$HOME --version=3.0.30 --verbose
curl -sL https://doc.akka.io/install-cli.sh | bash -s -- -P $HOME -v 3.0.30 -V
```
For manual installation, download [akka_linux_amd64_3.0.30.tar.gz](https://downloads.akka.io/3.0.30/akka_linux_amd64_3.0.30.tar.gz), extract the `akka` executable and make it available on your PATH.
macOS **Recommended approach**
The recommended approach to install `akka` on macOS, is using [brew](https://brew.sh/)
```bash
brew install akka/brew/akka
```
If the `akka` CLI is already installed, and you want to upgrade `akka` to the latest version, you can run
```bash
brew update
brew upgrade akka
```
**Alternative approach**
curl -sL https://doc.akka.io/install-cli.sh | bash You can pass options to the installer script with `-s --` e.g.:
```bash
curl -sL https://doc.akka.io/install-cli.sh | bash -s -- --prefix=$HOME --version=3.0.30 --verbose
curl -sL https://doc.akka.io/install-cli.sh | bash -s -- -P $HOME -v 3.0.30 -V
```
Windows
1. Download the latest version of `akka` from [https://downloads.akka.io/latest/akka_windows_amd64.zip](https://downloads.akka.io/latest/akka_windows_amd64.zip)
2. Optionally, you can verify the integrity of the downloaded files using the [SHA256 checksums](https://downloads.akka.io/latest/checksums.txt).
3. Extract the zip file and move `akka.exe` to a location on your `%PATH%`.
Verify that the Akka CLI has been installed successfully by running the following to list all available commands:
```command
akka help
```
## Related documentation
- [Using the Akka CLI](using-cli.html)
- [Enable CLI command completion](command-completion.html)
- [CLI command reference](../../reference/cli/akka-cli/index.html)
[CLI](index.html) [Using the Akka CLI](using-cli.html)
404 Not Found
Not Found
The requested URL was not found on this server.
Apache/2.4.63 (Ubuntu) Server at doc.akka.io Port 443
404 Not Found
Not Found
The requested URL was not found on this server.
Apache/2.4.63 (Ubuntu) Server at doc.akka.io Port 443
404 Not Found
Not Found
The requested URL was not found on this server.
Apache/2.4.63 (Ubuntu) Server at doc.akka.io Port 443
- [Akka](../../index.html)
- [Operating](../index.html)
- [Akka Automated Operations](../akka-platform.html)
- [Observability and monitoring](index.html)
- [View logs](view-logs.html)
# View logs
Akka provides logs that you can view in the Console or access with the CLI. For each service instance we aggregate a maximum of 1MB of log data. You can capture all log output by attaching a logging provider, such as Google Cloud’s operations suite (formerly Stackdriver), as described [here](observability-exports.html#_google_cloud).
## Aggregated logs
To view aggregated logs:
Browser
1. From the project **Dashboard**, select a deployed service.
2. From the service **Overview** page, select **Logs** from the top tab or from the left navigation menu.
The **Logs** table displays logging output, which you can filter with the control on top.
CLI With a command window set to your project, use the `akka logs` command to view the logs for a running service:
```command
akka logs <>
```
## Exporting logs
Logs can be exported for searching, reporting, alerting and long term storage by configuring the Akka observability configuration for your project. See [here](observability-exports.html) for detailed documentation.
## Correlating logs
You can correlate your log statements, those that you write in your application, by adding the MDC pattern `%mdc{trace_id}` to your log file when tracing is [enabled](observability-exports.html#activating_tracing). Like the following:
logback.xml
```xml
%d{HH:mm:ss.SSS} %-5level %logger{36} trace_id: %mdc{trace_id} - %msg%n
...
```
This way, the trace ID that’s passed through your components will be added to your logs. For more information on tracing, click [here](traces.html).
## See also
- `akka logs` commands
[Observability and monitoring](index.html) [View metrics](metrics.html)
- [Akka](../../index.html)
- [Operating](../index.html)
- [Akka Automated Operations](../akka-platform.html)
- [Observability and monitoring](index.html)
- [View traces](traces.html)
# View traces
Akka projects have the traces dashboard built-in as part of the Control Tower in the Akka Console. This is available out-of-the-box. You can find your traces here as long as you have [enabled the traces](observability-exports.html#activating_tracing) in your service.
In the top panel you have the list of traces you can inspect. When you click on one of them, the contents of the trace are displayed in the panel below. As shown in the figure.

You can filter by time to select traces in the desired time period. And further select the spans of a trace to find out more details about its attributes and resources, as shown in the figure.

[View metrics](metrics.html) [Exporting metrics, logs, and traces](observability-exports.html)
- [Akka](../../index.html)
- [Operating](../index.html)
- [Akka Automated Operations](../akka-platform.html)
- [Observability and monitoring](index.html)
- [View metrics](metrics.html)
# View metrics
Akka projects have a built-in dashboard as part of the Control Tower in the Akka console. You can see metrics such as requests per second, replicas of a service, or commands received by a component. Data is grouped into categories: Services, Event Sourced Entities, Key Value Entities, Endpoints, Views, Workflows, Consumers, and Replication. The following shows a section of the dashboard.
The content of the panels can be filtered using the filters at the top.

## Categories
### Services
**Successful Requests:** Rate of successful requests per second (reqs/s) over time, by endpoint.
**Failed Requests:** Rate of requests (reqs/s) that raised an error when processing the request, over time, by endpoint.
**Processing time distribution(seconds):** Number of requests grouped by processing duration, by endpoint.
**Processing time 99p:** 99th percentile of processing time, over time, by endpoint.
**Processing time histogram:** Number of calls that fall into each processing time bucket over time, by endpoint i.e., a histogram of processing time, over time.
**Instances:** Number of running instances of the service.
**Version:** A single number, always increasing, shows the service incarnation number. E.g. for a service deployed three times, the value would be 3.
**Data ops (read/writes):** Total number of reads from the DB by any Akka component of the service(s) and endpoint(s)/method(s) selected. Total number of writes by any Akka component of the selected service(s) and endpoint(s)/method(s) selected.
### Event Sourced Entities
**Commands received:** Rate of commands received per second over time.
**Stored events:** Total number of events stored per second over time.
**Data ops(reads/writes):** Total number of reads when loading from the DB the latest snapshot and the events afterward. Total number of writes when persisting the events or the snapshots generated by the entity.
**Processing time percentiles:** 50th, 95th, and 99th percentiles for the processing time of the commands.
### Key Value Entities
**Commands received:** Rate of commands per second over time.
**Data ops(reads/writes):** Total number of reads when loading its state from the DB. Total number of writes when persisting its state in the DB.
**Processing time percentiles:** 50th, 95th, and 99th percentiles for the processing time of the commands.
### Endpoints
**Messages received:** Number of messages per second over time
**Processing time percentiles:** 50th, 95th, and 99th percentiles for the processing time of the messages.
### Views
**Rows updated:** Number of rows updated per second over time.
**Query request received:** Number of query requests received per second over time.
**Average update size:** Average size of each update. Calculated by dividing the total size of the update by the number of rows.
**Average query result size:** The average size of a query. Calculated by dividing the total size of the queries by the number of queries requested.
### Workflows
**Commands received:** Rate of commands per second over time.
**Data ops(reads/writes):** Total number of reads when loading from the DB the latest snapshot and the events afterward. Total number of writes, by workflow, when persisting the events or the snapshots generated by the workflow.
**Processing time quantiles:** 50th, 95th, and 99th percentiles for processing time of the command.
### Consumers
**Events consumed:** The processing rate of events consumed by a subscription.
**Subscriptions failed:** Failures consuming events from a Consumer or a View.
**Events consumption lag - average:** Average delay in consumption of events by a Consumer or a View.
**Events consumption lag:** 50th, 95th, and 99th percentiles on the delay in consumption of events by a Consumer or a View. Measured in wall-clock time.
**Events processing time - average:** Average duration for event processing (including user service and persist) by a Consumer or a View.
**Events processing time:** 50th, 95th, and 99th percentiles of the duration it takes a Consumer or a View to process events, including user service and persist.
### Replication
**Replicated events:** The rate of multi-region event replication.
**Replication lag - average:** Average lag for multi-region event replication.
**Replication failures:** Failure rate for multi-region replication.
[View logs](view-logs.html) [View traces](traces.html)
- [Akka](../../index.html)
- [Operating](../index.html)
- [Akka Automated Operations](../akka-platform.html)
- [Observability and monitoring](index.html)
# Observability and monitoring
Akka provides a host of observability and monitoring capabilities and is designed to plug into your existing monitoring tools. This means that while the tools in [Akka Console](https://console.akka.io/) will allow you to understand what is happening, they are designed to feed other tools you use to monitor, log, and observe your applications and services over time.
You can view logs, metrics, and traces via the following:
- [View logs](view-logs.html)
- [View metrics](metrics.html)
- [View traces](traces.html)
To export this data into your other tools see [Exporting metrics, logs, and traces](observability-exports.html) for more information.
[TLS certificates](../tls-certificates.html) [View logs](view-logs.html)
- [Akka](../../index.html)
- [Operating](../index.html)
- [Akka Automated Operations](../akka-platform.html)
- [Observability and monitoring](index.html)
- [Exporting metrics, logs, and traces](observability-exports.html)
# Exporting metrics, logs, and traces
Akka supports exporting metrics, logs, and traces to a variety of different destinations for reporting, long term storage and alerting. Metrics, logs, and traces can either be exported to the same location, by configuring a default exporter, or to different locations by configuring separate logging, metrics, and tracing exporters. Only one exporter for each may be configured.
Observability configuration is configured per Akka project. All services in that project will use the same observability config. Configuration can either be done by specifying an observability descriptor, or by running CLI commands.
When updating observability configuration, the changes will not take effect until a service is restarted.
## Working with observability descriptors
The Akka observability descriptor allows observability export configuration to be specified in a YAML file, for versioning and reuse across projects and environments.
### Exporting the observability configuration
To export the current configuration, run:
```command
akka project observability export
```
This will write the observability YAML descriptor out to standard out. If preferred, the `-f` argument can be used to specify a file to write the descriptor out to.
```yaml
exporter:
kalixConsole: {}
logs: {}
metrics: {}
traces: {}
```
### Updating the observability configuration
To update the current configuration, run:
```command
akka project observability apply -f observability.yaml
```
Where `observability.yaml` is the path to the YAML descriptor.
### Editing the observability configuration in place
If you just want to edit the observability configuration for your project, without exporting and then applying it again, run:
```command
akka project observability edit
```
This will open the observability descriptor in a text editor. After saving and exiting the editor, the saved descriptor will be used to update the configuration.
| | After updating your observability configuration, you will need to restart a service to apply the new configuration. Akka automatically makes that a rolling restart. |
### Activating tracing (Beta)
The generation of traces is disabled by default. To enable it you need to set [telemetry/tracing/enabled](../../reference/descriptors/service-descriptor.html#_servicespec) to `true` in the service descriptor. Like the following:
```yaml
name: <>
service:
telemetry:
tracing:
enabled: true
image: <>
```
[Deploy the service with the descriptor](../services/deploy-service.html#apply).
Once this is set, Akka will start generating [spans](https://opentelemetry.io/docs/concepts/observability-primer/#spans) for the following components: Event Sourced Entities, Key Value Entities, Endpoints, Consumers, and Views.
Another possible use is to add a `traceparent` header when calling your Akka endpoint. In this case Akka will propagate this trace parent as the root of the subsequent interaction with an Akka component. Linking each Akka call to that external trace parent.
#### Setting sampling
By default, Akka filters traces and exports them to your Akka Console. You’ll get 1% of the traces produced by your services. You can adjust this percentage according to your needs.
This filtering is known as [head sampling](https://opentelemetry.io/docs/concepts/sampling/#head-sampling). To configure it, you need to set your observability descriptor as follows and [update the observability configuration](about:blank#_updating_the_observability_configuration):
```yaml
traces:
sampling:
probabilistic:
percentage: "2"
```
With this configuration, 2% of the traces are sent while the 98% are filtered. More on how much sampling [here](https://opentelemetry.io/docs/concepts/sampling/#when-to-sample).
## Updating the configuration using commands
The Akka observability configuration can also be updated using commands. To view a human-readable summary of the observability configuration, run:
```command
akka project observability get
```
To change configuration, the `set` command can be used. To change the default exporter for both logs and metrics, use `set default`, to change the exporter just for metrics, use `set metrics`, and to change the exporter just for logs, use `set logs`.
When using the `set` command, the default, logs or metrics exporter configuration will be completely replaced. It’s important to include the full configuration for that exporter when you run the command. For example, if you run `akka project observability set default otlp --endpoint otlp.example.com:4317`, and then you want to add a header, you must include the `--endpoint` flag when setting the header.
## Supported exporters
Akka supports a number of different destinations to export metrics, logs, and traces to. The example commands and configuration below will show configuring the default exporter, if the exporter supports metrics, logs, and traces, or the metrics, logs, or traces as applicable if not.
### Akka Console
The Akka Console is the default destination for metrics and traces. It provides a built-in, short term time series database for limited dashboards displayed in the Akka Console. To configure it:
Descriptor
```yaml
default:
kalixConsole: {}
```
CLI
```command
akka project observability set default akka-console
```
### OTLP
OTLP is the gRPC based protocol used by OpenTelemetry. It is supported for logs, metrics, and traces. The primary piece of configuration it needs is an endpoint. For example:
Descriptor
```yaml
default:
otlp:
endpoint: otlp.example.com:4317
```
CLI
```command
akka project observability set default otlp --endpoint otlp.example.com:4317
```
In addition, the OTLP exporter supports [TLS configuration](about:blank#_tls_configuration) and [custom headers](about:blank#_custom_headers). A full reference of configuration options is available in [the reference documentation](../../reference/descriptors/observability-descriptor.html#_observabilityotlp).
### Prometheus Remote Write
The Prometheus remote write protocol is supported for exporting metrics. It is generally used to write metrics into Cortex and similar long term metrics databases for Prometheus. The primary piece of configuration it needs is an endpoint. For example:
Descriptor
```yaml
metrics:
prometheuswrite:
endpoint: https://prometheus.example.com/api/v1/push
```
CLI
```command
akka project observability set metrics prometheus --endpoint https://prometheus.example.com/api/v1/push
```
In addition, the Prometheus exporter supports [TLS configuration](about:blank#_tls_configuration) and [custom headers](about:blank#_custom_headers). A full reference of configuration options is available in [the reference documentation](../../reference/descriptors/observability-descriptor.html#_observabilityprometheuswrite).
### Splunk HEC
The Splunk HTTP Event Collector protocol is supported for exporting both metrics and logs. It is used to export to the Splunk platform. It needs an endpoint and a splunk token. The Splunk token must be configured as a [Akka secret](../projects/secrets.html), which then gets referenced from the observability configuration.
Descriptor
```yaml
default:
splunkHec:
endpoint: https://.splunkcloud.com:8088/services/collector
tokenSecret:
name: my-splunk-token
key: token
```
CLI
```command
akka project observability set default splunk-hec \
--endpoint https://.splunkcloud.com:8088/services/collector \
--token-secret-name my-splunk-token --token-secret-key token
```
In addition, the Splunk HEC exporter supports [TLS configuration](about:blank#_tls_configuration). A full reference of configuration options is available in [the reference documentation](../../reference/descriptors/observability-descriptor.html#_observabilitysplunkhec).
### Google Cloud
Google Cloud is supported for exporting logs, metrics, and traces. The primary piece of configuration it needs is a service account JSON key. The service account associated with the key must have the following IAM roles:
- If exporting metrics to Google Cloud, it must have the `roles/monitoring.metricWriter` role.
- If exporting logs to Google Cloud, it must have the `roles/logging.logWriter` role.
To create such a service account and key using the `gcloud` command, assuming you are logged in and have a Google project configured:
1. Create a service account. In this example, we’ll call it `akka-exporter`.
```shellscript
gcloud iam service-accounts create akka-exporter
```
2. Grant the metrics and logging roles, as required, to your service account. Substitute your project ID for ``.
```shellscript
gcloud projects add-iam-policy-binding \
--member "serviceAccount:akka-exporter@.iam.gserviceaccount.com" \
--role "roles/monitoring.metricWriter"
gcloud projects add-iam-policy-binding \
--member "serviceAccount:akka-exporter@.iam.gserviceaccount.com" \
--role "roles/logging.logWriter"
```
3. Generate a key file for your service account, we’ll place it into a file called `key.json`.
```shellscript
gcloud iam service-accounts keys create key.json \
--iam-account akka-exporter@.iam.gserviceaccount.com
```
4. Place the key file in an Akka secret, we’ll call the secret `gcp-credentials`. The key for key file must be `key.json`.
```shellscript
akka secret create generic gcp-credentials \
--from-file key.json=key.json
```
Now that you have configured service account, granted it the necessary roles, created a service account key and placed it into an Akka secret, you can now configure your observability configuration to export to Google Cloud:
Descriptor
```yaml
default:
googleCloud:
serviceAccountKeySecret:
name: gcp-credentials
```
CLI
```command
akka project observability set default google-cloud --service-account-key-secret gcp-credentials
```
## Common exporter configuration
### TLS configuration
TLS configuration for multiple different exporters can be configured. To turn off TLS altogether, the `insecure` property can be set to `true`:
Descriptor
```yaml
default:
otlp:
endpoint: otlp.example.com:4137
tls:
insecure: true
```
CLI
```command
akka project observability set default otlp \
--endpoint otlp.example.com:4137 --insecure
```
To skip verifying server certificates, use insecure skip verify:
Descriptor
```yaml
default:
otlp:
endpoint: otlp.example.com:4137
tls:
insecureSkipVerify: true
```
CLI
```command
akka project observability set default otlp \
--endpoint otlp.example.com:4137 --insecure-skip-verify
```
To specify a custom CA to verify server certificates, use the server CA property, pointing to an Akka CA secret:
Descriptor
```yaml
default:
otlp:
endpoint: otlp.example.com:4137
tls:
caSecret:
name: my-ca
```
CLI
```command
akka project observability set default otlp \
--endpoint otlp.example.com:4137 --server-ca-secret my-ca
```
To specify a client certificate to use to authenticate with a remote server, you can use the client certificate property, pointing to an Akka TLS secret:
Descriptor
```yaml
default:
otlp:
endpoint: otlp.example.com:4137
tls:
clientCertSecret:
name: my-client-certificate
```
CLI
```command
akka project observability set default otlp \
--endpoint otlp.example.com:4137 \
--client-cert-secret my-client-certificate
```
### Custom headers
Custom headers may be configured for a number of exporters. Headers can either have static values, configured directly in the observability configuration, or they can reference secrets.
To specify a static header:
Descriptor
```yaml
default:
otlp:
endpoint: otlp.example.com:4137
headers:
- name: X-My-Header
value: some-value
```
CLI
```command
akka project observability set default otlp \
--endpoint otlp.example.com:4137 \
--header X-My-Header=some-value
```
To set a header value from a secret:
Descriptor
```yaml
default:
otlp:
endpoint: otlp.example.com:4137
headers:
- name: X-Token
valueFrom:
secretKeyRef:
name: my-token
key: token
```
CLI
```command
akka project observability set default otlp \
--endpoint otlp.example.com:4137 \
--header-secret X-Token=my-token/token
```
## Debugging observability configuration
After updating your observability configuration, you will need to restart a service to use it. This can be done by running the `akka service restart` command. Once the service has been restarted, if there are any issues, you can check the observability agent logs, by running the following command:
```command
akka logs --instance=false --observability
```
This will show the observability agent logs for all instances of the service. Any errors that the agent encountered will be displayed here.
## See also
- `akka project observability` commands
[View traces](traces.html) [Integrating with CI/CD tools](../integrating-cicd/index.html)
404 Not Found
Not Found
The requested URL was not found on this server.
Apache/2.4.63 (Ubuntu) Server at doc.akka.io Port 443
404 Not Found
Not Found
The requested URL was not found on this server.
Apache/2.4.63 (Ubuntu) Server at doc.akka.io Port 443
- [Akka](../index.html)
- [Understanding](index.html)
- [Multi-region operations](multi-region.html)
# Multi-region operations
Akka applications run in multiple regions with their data transparently and continuously replicated even across multiple cloud providers.
Akka applications do not require code modifications to run within multiple regions. Operators define controls to determine which regions
an application will operate within and whether that application’s data is pinned to one region or replicated across many.
Akka ensures regardless of which region receives a request, the request can be serviced. Multiple replication strategies can be configured, with each offering varying features for different use cases.
Multi-region operations are ideal for:
- Applications that require 99.9999% availability
- Geographic failover
- Geo-homing of data for low latency access
- Low latency global reads
- Low latency global writes
Akka has two replication modes: replicated reads and replicated writes.
## Replicated reads
Akka’s replicated reads offers full data replication across regions and even cloud providers, without any changes to the service implementation: an entity has its "home" in one *primary region*, while being replicated to multiple other regions.
Read requests are always handled locally within the region where they occur.
An entity can only be updated within a single region, known as its primary region.
Primary region selection for entities is configurable. There are two modes for primary selection: **pinned-region** and **request-region**.
Pinned-region primary selection mode (default) All entities use the same primary region, which is selected statically as part of the deployment. Write requests to the primary region of the entity are handled locally. Write requests to other regions are forwarded to the primary region. The primary region stays the same until there is an operational change of the primary region.
This is useful for scenarios where you want one primary region, with the ability to fail over to another region in the case of a regional outage.
Request-region primary selection mode The primary region changes when another region receives a write request. Upon a write request to an entity in a region that is not the primary it will move its primary. The new primary ensures that all preceding events from the previous primary have been fully replicated and applied (i.e. persisted) before writing the new event, and thereby guarantees strong consistency when switching from one region to another. Subsequent write requests to the primary region of the entity are handled locally without any further coordination. Write requests to other regions will trigger the same switch-over process. All other entity instances operate unimpeded during the switch-over process.
This is useful for scenarios where you want to have the primary region for your data close to the users who use the data. A user, Alice, in the USA, will have her data in the USA, while a user Bob, in the UK, will have his data, in the UK. If Alice travels to Asia the data will follow her.
The Operating section explains more details about [configuring the primary selection mode](../operations/regions/index.html#selecting-primary).
### Illustrating entities with pinned region selection

In the image above, the entity representing Alice has its primary region in Los Angeles. When a user A in the primary region performs a read request

, the request is handled locally, and the response sent straight back

.
When the user in the primary region performs a write request

, that request is also handled locally, and a response sent directly back

. After that write request completes, that write is replicated to other regions

, such as in London (UK).
A user B in London, when they perform a read

, that read operation will happen locally, and a response sent immediately back

.
A user can also perform write operations on entities in non-primary regions.

In this scenario, the user B in London (UK) is performing a write operation on the Alice entity

. Since London is not the primary region for the Alice entity, Akka will automatically forward that request to the primary region

, in this case, Los Angeles (USA). That request will be handled in the USA, and a response sent directly back to the user

.

When Bob makes a request in the UK on his data

, that request is handled locally

, and replicated to the US

. Exactly the same as Alice’s requests in the USA with her data are handled locally in the USA, and replicated to the UK.
The data however is still available in all regions. If Bob travels to the USA, he can access his data in the Los Angeles region.

When Bob travels to the USA, read requests that Bob makes on his data are handled locally

and getting an immediate reply

. Write requests, on the other hand, are forwarded to the UK

, before the reply is sent

.

Meanwhile, all requests made by Alice on her data are handled locally

and get an immediate reply

. The write operations are being replicated to the UK

.
## Replicated writes
The replicated write replication strategy allows every region to be capable of handling writes for all entities. This is done through the use of CRDTs, which can be modified concurrently in different regions, and their changes safely merged without conflict.
## Replication Guarantees
Akka guarantees that all events created within one region are eventually replicated to all other regions in the project.
Each entity’s state is a series of events that are persisted in a local event journal, which acts as the source of events that must be replicated from one region to another. Having a durable, local event journal is the foundation for how Akka can recover an entity’s state in the event of failure.
Each event has a sequence number that is validated on the receiving side to guarantee correct ordering and exactly-once processing of the events. A replicated event is processed by entities in other regions by having the event added to the local event journal of each entity. Once added to the local event journal, the replicated event can be used to update the entity’s state and handle read requests in those regions.
Events are delivered to other regions over a brokerless, streaming gRPC transport. The entity instance that needs to receive replicated events is a consumer and the entity that generated the events is the producer. Events flow from the producing region to the consuming region. An offset of the replication stream is stored on the consumer side, which will start from the previously stored offset when it initiates the replication stream. The producer side will publish events onto the replication stream directly while writing an entity or from reading the event journal after a failure. Duplicate events are detected and filtered out by the sequence numbers of the events. These replication streams can be sharded over many nodes to support high throughput.
[Memory models](state-model.html) [Saga patterns](saga-patterns.html)
- [Akka](../../index.html)
- [Developing](../index.html)
- [Integrations](index.html)
# Integrations
Akka enables seamless communication between services, components and external systems. The following integration options are available:
- [Component and Service Calls](../component-and-service-calls.html): Directly invoke other services or components within your application.
- [Message Brokers](../message-brokers.html): Publish to and subscribe to events from external message brokers like Kafka or Pulsar.
- [Streaming](../streaming.html): Built-in support for processing and reacting to streams of data.
- [Retrieval-Augmented Generation (RAG)](../rag.html): Enrich the context to an AI model with relevant content, using semantic search on a vector database, or retrieve structured information from entities and views.
[Consumers](../consuming-producing.html) [Component and service calls](../component-and-service-calls.html)
- [Akka](../index.html)
- [Understanding](index.html)
- [Endpoints](grpc-vs-http-endpoints.html)
# Endpoints
Endpoints components are how you expose your services to the outside world, be it another Akka service, external dependencies or client-facing applications. Three different types of endpoints are available: HTTP, gRPC and MCP Endpoints.
MCP (Model Context Protocol) endpoints are only for providing functionality to a remote agent and not for defining regular APIs, for more details see [Designing MCP Endpoints](../sdk/mcp-endpoints.html)
When designing APIs, choosing between HTTP and gRPC endpoints depends on the use case. This document outlines the key differences, strengths, and recommended usage for each approach.
## Key Differences
HTTP endpoints follow the traditional request-response model and are widely used for exposing APIs to external consumers. They use standard HTTP methods (GET, POST, PUT, DELETE, etc.) and typically exchange data in JSON format. This makes them accessible to web and mobile clients and easy to debug using common tools like browsers and API clients.
gRPC endpoints use the HTTP/2 protocol and Protobuf for data serialization, providing efficient and structured communication between services. They support various types of RPC calls, including unary and streaming, and are designed for high-performance, low-latency interactions. gRPC is commonly used for internal service-to-service communication due to its strong typing and schema evolution capabilities.
| Aspect | HTTP Endpoints | gRPC Endpoints |
| --- | --- | --- |
| Protocol | HTTP/1.1 or HTTP/2 | HTTP/2 |
| Serialization | JSON (text-based) | Protobuf (binary, compact) |
| Performance | Higher latency due to JSON parsing | Lower latency with efficient binary serialization |
| Streaming | Streaming from server (SSE) | Native bidirectional streaming |
| Tooling & Debugging | Easy to inspect and test with browser and other tools | Requires specialized tools due to binary format |
| Browser Support | Works natively in browsers | Requires gRPC-Web for use in browser |
| Backward Compatibility | Requires versioned endpoints or careful contract management | Supports schema evolution with Protobuf |
## When to use HTTP Endpoints
HTTP endpoints are recommended for client-facing APIs, including web and mobile apps. They offer broad compatibility, easy debugging, and integration with frontend frameworks.
Use HTTP endpoints when:
- The API is consumed directly by web browsers.
- Human readability and easy debugging are important.
- RESTful semantics, including standard HTTP methods and query parameters, are required.
- Familiarity among frontend developers is beneficial.
## When to use gRPC Endpoints
gRPC endpoints are recommended for service-to-service communication due to their efficiency and strong contract enforcement.
Use gRPC endpoints when:
- Services need to communicate with low latency and high throughput.
- Streaming (unary, client-streaming, server-streaming, bidirectional) is required.
- Backward and forward compatibility is essential for evolving services.
- Strongly typed service contracts are beneficial.
## Next Steps
For more information on designing and implementing HTTP and gRPC Endpoints in Akka, refer to the following guides:
- [Designing HTTP endpoints](../sdk/http-endpoints.html)
- [Designing gRPC Endpoints](../sdk/grpc-endpoints.html)
Additionally, note that both endpoint types can be secured using ACLs and JWTs, see:
- [Access Control Lists (ACLs)](../sdk/access-control.html)
- [JSON Web Tokens (JWT)](../sdk/auth-with-jwts.html)
[Saga patterns](saga-patterns.html) [Building AI agents](ai-agents.html)
- [Akka](../index.html)
- [Understanding](index.html)
- [Memory models](state-model.html)
# Memory models
Akka provides an in-memory, durable store for stateful data. Stateful data can be scoped to a single agent, or made available system-wide. Stateful data is persisted in an embedded event store that tracks incremental state changes, which enables recovery of system state (resilience) to its last known modification. State is automatically sharded and rebalanced across Akka nodes running in a cluster to support elastic scaling to terabytes of memory. State can also be replicated across regions for failover and disaster recovery.
Memory in Akka is structured around [entities](../reference/glossary.html#entity). An entity holds a particular slice of application state and evolves it over time according to a defined [state model](../reference/glossary.html#state_model). These state models determine how state is stored, updated, and replicated. This approach provides consistency and durability across the system, even in the face of failure. [Agents](../sdk/agents.html), for example, manage their memory through entities, whether for short-lived context or persistent behavior.
Akka uses an architectural pattern called *Event Sourcing*. Following this pattern, all changes to an application’s state are stored as a sequence of immutable events. Instead of saving the current state directly, Akka stores the history of what happened to it. The current state is derived by replaying those events. Memory is saved in an event journal managed by Akka, with events recorded both sequentially and via periodic snapshots for faster recovery.
| Event | Amount | Balance |
| --- | --- | --- |
| AccountOpened | $0 | $0 |
| FundsDeposited | +$1,000 | $1,000 |
| FundsDeposited | +$500 | $1,500 |
| FundsWithdrawn | -$200 | $1,300 |
| FundsDeposited | +$300 | $1,600 |
| FundsWithdrawn | -$400 | $1,200 |
Akka uses the Event Sourcing pattern for many internal stateful operations. For example, [Workflows](../sdk/workflows.html) rely on Event Sourcing to record each step as it progresses. This provides a complete history of execution, which can be useful for auditing, debugging, or recovery.
| Step | Action | Workflow State |
| --- | --- | --- |
| 1 | Withdraw from Account A | $500 withdrawn from Account A |
| 2 | Reserve funds | Funds marked for transfer |
| 3 | Deposit to Account B | $500 added to Account B |
| 4 | Confirm transfer | Transfer marked as complete |
| 5 | Send notification | Recipient notified |
| 6 | Save audit record | Transfer logged |
Tracking all state changes as a sequence of events allows you to create agentic systems that are also event-driven architectures. Akka provides event subscription, state subscription, brokerless messaging, and event replication, which makes it possible to chain together services that consume, monitor, synchronize, or aggregate the state of another service.

Memory is managed automatically by the [Agent](../sdk/agents.html) component. By default, each agent has session memory that stores interaction history and context using an [Event Sourced Entity](../sdk/event-sourced-entities.html). This memory is durable and retained across invocations. If needed, memory behavior can be customized or disabled [through configuration](../sdk/agents.html#_session_memory_configuration).
## Entity state models
Entities are used to store the data defined in the [domain model](architecture-model.html#_domain). They follow a specific *state model* chosen by the developer. The state model determines how the data is organized and persisted. Entities have data fields that can be simple or primitive types like numbers, strings, booleans, and characters. The fields can be more complex, which allows custom types to be stored in Akka.
Entities have operations that can change their state. These operations are triggered asynchronously and implemented via methods that return `Effect`. Operations allow entities to be dynamic and reflect the most up-to-date information and this all gets wired together for you.
Akka offers two state models: *Event Sourced Entity* and *Key Value Entity*. Event Sourced Entities build their state incrementally by storing each update as an event, while Key Value Entities store their entire state as a single entry in a Key/Value store. To replicate state across clusters and regions, Akka uses specific conflict resolution strategies for each state model.
Event Sourced Entities, Key Value Entities and Workflows replicate their state by default. If you deploy your Service to a Project that spans multiple regions the state is replicated for you with no extra work to be done. By default, any region can read the data, and will do so from a local store within the region, but only the primary region will be able to perform writes. To make this easier, Akka will forward writes to the appropriate region.
To understand more about regions and distribution see [Deployment model](deployment-model.html#_region).
### Identity
Each Entity instance has a unique id that distinguishes it from others. The id can have multiple parts, such as an address, serial number, or customer number. Akka handles concurrency for Entity instances by processing requests sequentially, one after the other, within the boundaries of a transaction. Akka proactively manages state, eliminating the need for techniques like lazy loading. For each state model, Akka uses a specific back-end data store, which cannot be configured.
#### Origin
Stateful entities in Akka have a concept of location, that is region, and are designed to span regions and replicate their data. For more information about regions see [region](deployment-model.html#_region) in the Akka deployment model.
Entities call the region they were created in their **origin** and keep track of it throughout their lifetime. This allows Akka to simplify some aspects of distributed state.
By default, most entities will only allow their origin region to change their state. To make this easier, Akka will automatically route state-changing operations to the origin region. This routing is asynchronous and durable, meaning network partitions will not stop the write from being queued. This gives you a read-anywhere model out of the box that automatically routes writes appropriately.
### The Event Sourced state model
The Event Sourced state model captures changes to data by storing events in a journal. The current entity state is derived from the events. Interested parties can read the journal and transform the stream of events into read models (Views) or perform business actions based on events.

A client sends a request to an Endpoint

. The request is handled in the Endpoint which decides to send a command to the appropriate Event sourced entity

, its identity is either determined from the request or by logic in the Endpoint.
The Event sourced entity processes the command

. This command requires updating the Event sourced entity state. To update the state it emits events describing the state change. Akka stores these events in the event store

.
After successfully storing the events, the event sourced entity updates its state through its event handlers

.
The business logic also describes the reply as the commands effect which is passed back to the Endpoint

. The Endpoint replies to the client when the reply is processed

.
| | Event sourced entities express state changes as events that get applied to update the state. |
### The Key Value state model
In the *Key Value* state model, only the current state of the Entity is persisted - its value. Akka caches the state to minimize data store access. Interested parties can subscribe to state changes emitted by a Key Value Entity and perform business actions based on those state changes.

A client sends a request to an Endpoint

. The request is handled in the Endpoint which decides to send a command to the appropriate Key Value entity

, its identity is either determined from the request or by logic in the Endpoint.
The Key Value entity processes the command

. This command requires updating the Key Value entity state. To persist the new state of the Key Value entity, it returns an effect. Akka updates the full state in its persistent data store

.
The business logic also describes the reply as the commands effect which is passed back to the Endpoint

. The Endpoint replies to the client when the reply is processed

.
| | Key Value entities capture state as one single unit, they do not express state changes in events. |
### State models and replication
Event Sourced entities are replicated between all regions in an Akka project by default. This allows for a multi-reader capability, with writes automatically routed to the correct region based on the origin of the entity.
In order to have multi-writer (or write anywhere) capabilities you must implement a conflict-free replicated data type (CRDT) for your Event Sourced Entity. This allows data to be shared across multiple instances of an entity and is eventually consistent to provide high availability with low latency. The underlying CRDT semantics allow replicated Event Sourced Entity instances to update their state independently and concurrently and without coordination. The state changes will always converge without conflicts, but note that with the state being eventually consistent, reading the current data may return an out-of-date value.
| | Although Key Value Entities are planned to support a Last Writer Wins (LWW) mechanism, this feature is not yet available. |
## Related documentation
- [Event Sourced Entities](../sdk/event-sourced-entities.html)
- [Key Value Entities](../sdk/key-value-entities.html)
[Delegation with Effects](declarative-effects.html) [Multi-region operations](multi-region.html)
- [Akka](../index.html)
- [Understanding](index.html)
# Understanding
This content here introduces key [concepts](concepts.html) to be aware of when developing Akka applications and services.
Everything in Akka is based on the [fundamental principles for distributed systems](distributed-systems.html).
[Service structure and layers](architecture-model.html) explains how Akka applications are structured in different layers.
Akka manages the operational aspects of your application. To learn about how Akka Services run in distributed infrastructure and may span multiple *Regions*, see [Deployment Model](deployment-model.html). Once deployed, Akka’s [Telemetry and Monitoring](../operations/observability-and-monitoring/index.html) provides operational insights into your deployment.
When you are familiar with the main aspects for Akka applications, continue with [Development Process](development-process.html) to understand the steps involved to implement a *Service*.
Components in Akka decouple behavior from execution by using [Delegation with Effects](declarative-effects.html).
A detailed explanation to how *Entities* persist their state, is presented in [Memory models](state-model.html) should you wish to learn more.
Orchestration use cases are often catered for best by considering *Sagas* which is discussed in [Saga patterns](saga-patterns.html).
## Topics
- [Concepts](concepts.html)
- [Distributed systems](distributed-systems.html)
- [Project structure](architecture-model.html)
- [Deployment model](deployment-model.html)
- [Development process](development-process.html)
- [Delegation with Effects](declarative-effects.html)
- [Memory models](state-model.html)
- [Multi-region operations](multi-region.html)
- [Saga patterns](saga-patterns.html)
- [Endpoints](grpc-vs-http-endpoints.html)
- [Building AI agents](ai-agents.html)
- [Inter-agent communications](inter-agent-comms.html)
- [Access control lists](acls.html)
[Additional samples](../getting-started/samples.html) [Concepts](concepts.html)
- [Akka](../index.html)
- [Understanding](index.html)
- [Development process](development-process.html)
# Development process
The main steps in developing a service with Akka are:
1. [Create a project](about:blank#_create_a_project)
2. [Specify service interface and domain model](about:blank#_specify_service_interface_and_domain_model)
3. [Implementing components](about:blank#_implement_components)
4. [Exposing components through Endpoints and Consumers](about:blank#_endpoints)
5. [Testing your application](about:blank#_create_unit_tests)
6. [Running locally](about:blank#_run_locally)
7. [Package service](about:blank#_package_service)
8. [Deploy](about:blank#_deploy)
## Create a project
All services and applications start as a Java project. Akka has a getting started sample that makes this easier. You will code your service in this project. See [Build your first agent](../getting-started/author-your-first-service.html) for more details.
## Specify service interface and domain model
Creating services in Akka follows the model described in [Project structure](architecture-model.html). You start with your domain model, which models your business domain in plain old Java objects. Then you will create Akka components to coordinate them.
The main components of an Akka service are:
- Stateful [Entities](../reference/glossary.html#entity)
- Stateful [Workflows](../reference/glossary.html#workflow)
- [Views](../reference/glossary.html#view)
- [Timed Actions](../reference/glossary.html#timed_action)
- [Consumers](../reference/glossary.html#consumer)
We recommend that you separate the service API and Entity domain data model. Separating the service interface and data model in different classes allows you to evolve them independently.
| | Kickstart a project using the [getting started guide](../getting-started/author-your-first-service.html). |
## Implementing components
In Akka, services can be stateful or stateless, and the components you implement depend on the service type.
Stateful services utilize components like [Event Sourced Entities](../sdk/event-sourced-entities.html), [Key Value Entities](../sdk/key-value-entities.html), [Workflows](../sdk/workflows.html), and [Views](../sdk/views.html), while stateless services focus on exposing functionality via [HTTP Endpoints](../sdk/http-endpoints.html). Typically, a stateful service is centered around one Entity type but may also include Endpoints and Views to expose or retrieve data.
### Entities
Stateful services encapsulate business logic in Key Value Entities or Event Sourced Entities. At runtime, command messages invoke operations on Entities. A command may only act on one Entity at a time.
| | To learn more about Akka entities see [Implementing Event Sourced Entities](../sdk/event-sourced-entities.html) and [Implementing key value entities](../sdk/key-value-entities.html). |
If you would like to update multiple Entities from a single request, you can compose that in the Endpoint, Consumer or Workflow.
Services can interact asynchronously with other services and with external systems. Event Sourced Entities emit events to a journal, which other services can consume. By defining your Consumer components, any service can expose their own events and consume events produced by other services or external systems.
### Workflows
Akka Workflows are high-level descriptions to easily align business requirements with their implementation in code. Orchestration across multiple services including failure scenarios and compensating actions is simple with [Workflows](../sdk/workflows.html).
### Views
A View provides a way to retrieve state from multiple Entities based on a query. You can create views from Key Value Entity state, Event Sourced Entity events, and by subscribing to topics. For more information about writing views see [Implementing Views](../sdk/views.html).
### Timed Actions
Timed Actions allow scheduling future calls, such as verifying process completion. These timers are persisted by the Akka Runtime and guarantee execution at least once.
For more details and examples take a look at the following topics:
- [Event Sourced Entities](../sdk/event-sourced-entities.html)
- [Key Value Entities](../sdk/key-value-entities.html)
- [Workflows](../sdk/workflows.html)
- [Views](../sdk/views.html)
- [Timed Actions](../sdk/timed-actions.html)
## Exposing components through Endpoints and Consumers
Endpoints are the primary means of exposing your service to external clients. You can use HTTP or gRPC Endpoints to handle incoming requests and return responses to users or other services. Endpoints are stateless.
To handle event-driven communication, Akka uses Consumers. Consumers listen for and process events or messages from various sources, such as Event Sourced Entities, Key Value Entities, or external messaging systems. They play a key role in enabling asynchronous, event-driven architectures by subscribing to event streams and reacting to changes in state or incoming data.
In addition to consuming messages, Consumers can also produce messages to topics, facilitating communication and data
flow between different services. This makes them essential for coordinating actions across distributed services and ensuring smooth interaction within your application ecosystem.
For more information, refer to:
- [Designing HTTP endpoints](../sdk/http-endpoints.html)
- [Designing gRPC Endpoints](../sdk/grpc-endpoints.html)
- [Consuming and producing](../sdk/consuming-producing.html)
## Testing your application
Writing automated tests for your application is a good practice. Automated testing helps catch bugs early in the development process, reduces the likelihood of regressions, enables confident refactoring, and ensures your application behaves as expected. There are three main types of tests to consider: unit tests, integration tests, and end-to-end tests.
### Unit Tests
Unit tests focus on testing individual components in isolation to ensure they work as intended. The Akka SDK provides a test kit for unit testing your components.
### Integration Tests
Integration tests validate the interactions between multiple components or services within your application, ensuring that different parts of your system work together as intended.
### End-to-End Tests
End-to-end tests validate the entire application by simulating real-world user scenarios. These tests span multiple services or modules to ensure the system functions correctly as a whole, whether within the same project or across different projects. For example, you might test the data flow between two Akka services in the same project using service-to-service eventing. Akka also offers flexible configuration options to accommodate various environments.
## Running locally
You can test and debug your services by [running them locally](../sdk/running-locally.html) before deploying your *Service*. This gives you a local debug experience that is convenient and easy.
## Package service
You use Docker to package your service and any of its dependencies for deployment. Distributing services as docker images makes Akka more cloud friendly and works well with containerization tools.
See [container registries](../operations/projects/container-registries.html) for more information.
## Deploy
After testing locally, deploy your service to Akka Automated Operations (akka.io) using the CLI or the Console.
The following pages provide information about deployment:
- [Akka projects](../operations/projects/index.html)
- [Deploying a packaged service](../operations/services/deploy-service.html#_deploying_a_service)
## Next steps
Now that you have a project and have deployed it you should familiarize yourself with operating an Akka project. See [Operating](../operations/index.html) for more information about operating Akka services.
The following topics may also be of interest.
- [Developer best practices](../sdk/dev-best-practices.html)
[Deployment model](deployment-model.html) [Background execution](background-execution.html)
- [Akka](../index.html)
- [Understanding](index.html)
- [Deployment model](deployment-model.html)
# Deployment model
Akka services are distributed by design. You may run them locally, but they are built to operate across nodes without requiring changes to your code.
## Service packaging
Services created with Akka components are composable. They can support agentic, transactional, analytics, edge, and digital twin systems. You may create a service with a single component or many.
Services are packed into a single binary. You can deploy it to various infrastructures including Platform as a Service (PaaS), Kubernetes, Docker Compose, virtual machines, bare metal, or edge computing environments.
Akka services cluster on their own. You do not need a service mesh. The clustering offers elasticity and resilience. Built-in features include data sharding, data rebalancing, traffic routing, and support for handling network partitions.
## Deployment choices
Akka supports three deployment models. Behaviour remains consistent across them, and code changes are not needed when switching modes.
| Deployment Model | Description |
| --- | --- |
| Development | Developers can build, run, and test multi-service projects locally without needing cloud infrastructure. The Akka SDK provides persistence, clustering, service discovery, and integration features. This is the default when any service using Akka SDK is built. You may also [run the local console](../sdk/running-locally.html#_local_console) for tracing and debugging. |
| [Self-managed operations](../operations/configuring.html) | Akka clusters [can be run on your infrastructure](concepts.html#_service_packaging): virtual machines, containers, Platform as a Service (PaaS), edge, unikernels, or Kubernetes. You will need to configure routing, certificates, networking, and persistence yourself. Some PaaS systems may block network access, affecting clustering. In those cases, single-node operation is possible. Observability is available through the Akka console or by [exporting logs, metrics, and traces](../operations/observability-and-monitoring/observability-exports.html). |
| Akka Automated Operations (AAO) | This optional product helps automate day 2 operations. It provides a global federation plane for managing federated regions, along with an application plane for running services in a secure way. Services can be deployed from the Akka CLI to either [Akka’s serverless cloud](../operations/index.html) or a [privately managed VPC region](../operations/index.html).
AAO supports multi-region setups, including replication of durable state, failover arrangements, and data pinning for compliance needs. It provides elasticity based on observed traffic, memory auto-scaling, rolling upgrades without downtime, and access control at the organizational level. Observability is available through the [Akka console](https://console.akka.io/) or by [exporting logs, metrics, and traces](../operations/observability-and-monitoring/observability-exports.html).
AAO monitors traffic and system conditions and adjusts deployments to meet targets for availability and performance. |

## Logical deployment model
### Services
A [service](../operations/services/index.html) is the main unit of deployment. It includes all components as described in [project structure](architecture-model.html) and is packaged into a binary. Services may be started, stopped, paused, or scaled independently.
### Projects
A project contains one or more services intended to be deployed together. It provides shared management capabilities. In AAO, projects also specify regions for deployment. The first region listed becomes the primary and initial deployment target when [creating a project](../operations/projects/create-project.html).
## Physical deployment model
Akka services run in clusters. A cluster is a single Akka runtime spanning multiple nodes in a geographical location called a region.
With self-managed operations, a region maps to one cluster. With AAO, you can have multiple regions, each with its own clusters. These may be federated through a global federation plane. This enables service replication across regions and simplifies service discovery.
## Regions in Akka Automated Operations
A region corresponds to a cloud provider’s location, such as AWS "US East." Akka spans availability zones and can scale multiple hyperscaler clouds. Projects specify the regions where they run. Each region receives a unique endpoint with region-specific DNS, much like services such as S3 or SQS. [Container registries](../operations/projects/container-registries.html) exist in all regions to reduce latency.
## About Akka clustering
Clustering is integral to how Akka systems manage themselves. Services discover each other at startup and form clusters without manual setup. A connection to a single node is enough to join an existing cluster.

Clustering provides support for:
- Elastic scaling
- Failover
- Traffic steering
- Built-in discovery
- Consensus and split-brain handling
- Zero trust communication
- Request routing and scheduling
- Conflict-free replication
- Point-to-point messaging
These capabilities enable stateful services to be resilient, durable, and capable of acting as their own orchestrators and in-memory caches.
## Next steps
Now that you understand the overall architecture and deployment model of Akka you are ready to learn more about the [Development process](development-process.html).
The following topics may also be of interest.
- [Memory models](state-model.html)
- [Developer best practices](../sdk/dev-best-practices.html)
- [Project structure](architecture-model.html)
[Project structure](architecture-model.html) [Development process](development-process.html)
- [Akka](../index.html)
- [Understanding](index.html)
- [Saga patterns](saga-patterns.html)
# Saga patterns
Saga patterns help manage long-running business processes in distributed systems by dividing them into a series of transactions. Each transaction either completes successfully or triggers compensating actions if something goes wrong.
There are two common approaches to implementing Saga patterns: **choreography-based** and **orchestrator-based**. Both approaches ensure system consistency. They differ in how control and coordination are handled.
## Overview
| Orchestrator Pattern | Choreography Pattern |
| --- | --- |
| A central controller, or orchestrator, coordinates the process. It manages the sequence of steps to ensure that each transaction completes or that compensating actions are taken on failure. | Each service listens for events and acts independently. When it completes a transaction, it emits an event that triggers the next service. If a failure occurs, the service handles rollback logic. |
| - Centralized control and logic
- Easier to track progress and transaction state
- Clear audit trail
- Can become a coordination bottleneck
- Tighter coupling between orchestrator and services | - Decentralized control
- Low coordination overhead
- Services are only coupled to events
- Increased complexity in ensuring proper failure handling
- Harder to debug and monitor long-running flows |
| In Akka, you can implement this pattern using the [Workflow](../sdk/workflows.html) component. The Workflow defines each step and manages retries, timeouts, and compensating actions. | In Akka, you can implement this pattern by combining components such as [Entities](../sdk/event-sourced-entities.html) and [Consumers](../sdk/consuming-producing.html), each producing and reacting to events. |
| Example: [Funds Transfer Workflow Between Two Wallets](https://github.com/akka-samples/transfer-workflow-orchestration) | Example: [User Registration Service](https://github.com/akka-samples/choreography-saga-quickstart) |
## Choosing the right pattern
When selecting a Saga pattern, consider the architecture of your system and the nature of the business process.
Use choreography-based Sagas if:
- Your services are autonomous and can handle failure independently
- You prefer low coupling and high scalability
- You are comfortable with distributed control and eventual consistency
- You do not require central tracking of each step
- You are confident the complexity will be manageable as the system grows
Use orchestrator-based Sagas if:
- Your process includes tightly coordinated steps
- You need centralized visibility and clear state tracking
- Retrying, error handling, and compensation must be handled consistently
- You are fine with introducing a central coordination point
- You want assurance that complexity will scale more predictably as the system grows
## How to decide
- If your services benefit from independent execution and localized failure logic, choreography is a good fit. Be mindful that as more components participate in the flow, managing event-driven coordination and compensating logic can become more difficult.
- If your process requires clear visibility into progress and easier failure recovery, an orchestrator may be more suitable. Centralized coordination helps keep complexity manageable as the system evolves.
## Flexibility
It is possible to use both patterns in the same application. An orchestrator may manage the main business flow while individual services apply choreography to manage local side effects or edge cases. This combination allows a balanced trade-off between control and autonomy.
[Multi-region operations](multi-region.html) [Endpoints](grpc-vs-http-endpoints.html)
- [Akka](../index.html)
- [Developing](index.html)
- [Using an AI coding assistant](ai-coding-assistant.html)
# Using an AI coding assistant
AI coding assistants can increase your productivity when developing Akka services. This guide will give you some practical hints of how to setup Akka knowledge and how to prompt the AI assistant. We are using [Claude code](https://docs.claude.com/en/docs/claude-code/overview), [Qodo](https://www.qodo.ai/), [Cursor](https://www.cursor.com/) and [IntelliJ IDEA](https://www.jetbrains.com/help/idea/ai-assistant-in-jetbrains-ides.html) as examples of such coding assistants, but the techniques are applicable for other tools as well.
Some key benefits of using an AI coding assistant:
- **Scaffolding:** Quickly create a foundational structure for your Akka services, ready to be filled with business logic.
- **Faster learning:** Accelerate your understanding and application of Akka concepts.
- **Code comprehension:** Get an overview explanation of existing codebases or sample applications.
- **Debugging:** Get assistance in identifying and resolving issues.
- **Test generation:** Rapidly generate tests to ensure code correctness.
In summary, we will look at the following:
1. Akka documentation in LLM-friendly format
2. Configure your AI assistant (Cursor, Qodo, etc.) to use this documentation
3. Include relevant sample code as additional context
4. Use our coding guidelines template for better code generation
5. Follow the prompt examples for common Akka development tasks
## Why doesn’t AI know about latest Akka?
The LLMs have been trained on web content that didn’t include the latest documentation of the Akka SDK. If you ask it questions about Akka it will answer based on the knowledge it was trained on, which most certainly was about the Akka libraries. Some assistants will try to use web search to retrieve the latest information, but that is typically not enough and not an efficient way for a coding assistant. For example, if you ask:
```none
What are the core components of Akka?
```
The AI response will look something like this…
```none
Akka is a toolkit for building highly concurrent, distributed,
and resilient message-driven applications...
1. Actor System ...
2. Actors ...
...
```
This is correct for the Akka libraries but not helpful when developing with the Akka SDK.
We need to give the LLM knowledge about the latest Akka documentation.
## LLM-friendly documentation
In addition to human-readable HTML, the Akka documentation is also published in markdown format that an LLM can understand in a good and efficient way. Each page has a corresponding `.md` page, for example [event-sourced-entities.html.md](https://doc.akka.io/sdk/event-sourced-entities.html.md).
The markdown documentation is published according to the widely used standard proposal [llmstxt](https://llmstxt.org/):
- [llms.txt](https://doc.akka.io/llms.txt) - website index
- [llms-full.txt](https://doc.akka.io/llms-full.txt) - full, concatenated, documentation
- [llms-ctx.txt](https://doc.akka.io/llms-ctx.txt) - full documentation without the optional parts of llms.txt
- [llms-ctx-full.txt](https://doc.akka.io/llms-ctx-full.txt) - full documentation including the optional parts of llms.txt
## Setup AI assistant to use the Akka documentation
We need to make the AI coding assistant aware of the latest Akka documentation. The Akka CLI will help you with this. [Install the Akka CLI](../getting-started/quick-install-cli.html) and run:
```command
akka code init
```
1. Select an example, such as the "Hello world agent".
2. The CLI will download the Akka documentation and place it in the `akka-context` directory.
3. Select which AI coding assistant to use. The CLI will describe the additional steps of how to configure the assistant.
Make sure that you download the latest documentation regularly to make use of documentation improvements and new features. This can be done with:
```command
akka code ai-assistance-update .
```
The `akka-context` documentation bundle is also available as [akka-docs-md.zip](../sdk/_attachments/akka-docs-md.zip) if you prefer that.
Add `akka-context` to your `.gitignore` file, if you use git.
If your AI coding assistant isn’t included in the Akka CLI you can use the [AGENTS.md](https://agents.md/) option in the Akka CLI, or download it from [Akka AGENTS.md](../_attachments/AGENTS.md).
### Notes about Claude code
For [Claude code](https://www.anthropic.com/claude-code) the `CLAUDE.md` from the Akka CLI includes the detailed instructions from `AGENTS.md`. The reason for the separation into two files is that you should be able to download updated versions of `AGENTS.md` and have your custom instructions in `CLAUDE.md`.
This `CLAUDE.md` also defines an iterative generation workflow. You can modify or remove that if you prefer another way of working with Claude.
### Notes about Cursor
An alternative to the local `akka-context` documentation is to use documentation from a custom website, and include relevant information to the LLM by similarity search of that content.
You can point it directly to `https://doc.akka.io/llms-full.txt`, which is already in LLM-friendly markdown format.
You find the settings for custom documentation in: Cursor Settings > Features > Docs
In the chat window it is important that you include the Akka documentation as context. Type `@Docs` - tab, and select the custom Akka docs that you added in the settings.
### Notes about Qodo
In the chat window it is important that you include the Akka documentation as context. Use `@` to include the `akka-context` folder.
### Notes about IntelliJ IDEA AI assistant
For the AI assistant in IntelliJ IDEA you can download the [llms-ctx.txt](https://doc.akka.io/llms-ctx.txt) file and place it in the root of the project directory. The AI assistant will include relevant information to the LLM.
Add `llms-ctx.txt` to your `.gitignore` file, if you use git.
It is important that you include the Akka documentation as context by enabling `Codebase` in the chat window.
Make sure that you download the latest documentation regularly to make use of documentation improvements and new features.
### Notes about Gemini CLI
If Gemini CLI doesn’t make use of the documentation in `akka-context` directory it can be because it is listed in `.gitignore`. Then you have to remove `akka-context` from `.gitignore`.
### Notes about OpenAI Codex
If Codex doesn’t make use of the documentation in `akka-context` directory it can be because it is listed in `.gitignore`. Then you have to remove `akka-context` from `.gitignore`.
## Verify that it works
To verify that the assistant now knows about Akka, we can ask the question again:
```none
What are the core components of Akka?
```
it should answer with something like
```none
1. Event Sourced Entities ...
2. Key Value Entities ...
3. HTTP Endpoints ...
...
```
## Include sample source code
Even though the documentation includes comprehensive code snippets it can be good to include the full source code of one or a few samples. This makes it easier for the coding assistant to follow the same structure as the sample.
1. Pick one or a few samples from [Additional samples](../getting-started/samples.html), which are relevant to what you are developing. If you are just getting started learning Akka you can pick the Shopping Cart sample.
2. Clone the sample GitHub repository. Pull latest if you have already cloned the repository before.
3. Copy the source code to a folder `akka-context/` in your development project, e.g. `akka-context/travel-agent/src`.
4. Add `akka-context/` to your `.gitignore` file, if you use git.
Include the samples (`akka-context/`) as context in the chat window.
Make sure that you pull the latest samples regularly to make use of improvements and new features.
## Coding guidelines
The coding assistant will generate more accurate code if we give it some detailed instructions. We have prepared such [guidelines](ai-coding-assistant-guidelines.html) that you can use as a template. You find even more detailed instructions in [AGENTS.md](../_attachments/AGENTS.md)
For some assistants you can define instructions in configuration settings or files like `AGENTS.md` or `CLAUDE.md`.
If your AI coding assistant doesn’t support that, you can include the guidelines directly in the chat session prompt like this:
```none
Don't generate any code yet, but remember the following guidelines and use them when writing code in this project.
```
You can copy-paste the guidelines from [ai-coding-assistant-guidelines.html.md](https://doc.akka.io/sdk/ai-coding-assistant-guidelines.html.md)
## Prompt examples
Here are some examples of prompts that you can use as templates when giving instruction to the coding assistant.
### General advise
- Develop incrementally and don’t ask for too much at the same time.
- Compile and test after each step using `mvn test` or `mvn verify`. Fix compilation errors and test failures before proceeding too far.
- Commit the changes often so that you can compare and revert if something goes wrong.
- Be precise in the instructions and make corrections by further instructions if it doesn’t generate what you want.
- Even with custom docs, AI might still occasionally "hallucinate" or provide slightly off answers. It’s important to include time for human review in the development loop.
- Make sure that the AI does not introduce security vulnerabilities. You are still responsible for the generated code.
- Some things are just easier with ordinary IDE tooling, such as simple refactoring.
### Entities
```none
Create a credit card entity, use the shopping cart sample as template.
```
That will probably generate an event sourced entity, but you can be more specific by saying "event sourced entity" or "key value entity."
To matches your business domain you should be more precise when it comes to what to include in the domain objects. Start small, and iterate.
```none
Let's add a unit test for the entity
```
Ensure it uses the `EventSourcedTestKit`, which is described in the coding guidelines.
### Endpoints
```none
Add an http endpoint for the entity
```
```none
Add example curl commands for the endpoint to the readme
```
```none
Add an integration test for the endpoint
```
Ensure it uses the integration test is using the `httpClient` of the `TestKitSupport`, which is described in the coding guidelines.
### Views
```none
Add a View that lists brief credit card information given a cardholder name
```
```none
Add an integration test for the view
```
```none
Include the endpoint for the view in the existing CreditCardEndpoint
```
```none
add example curl commands for that in the readme
```
### Workflow
```none
Create a Workflow that transfers money from an external bank service to the credit card. It should have the following steps:
- withdraw
- deposit
- compensate-withdraw
The transitions for a transfer:
- starts with the bank withdrawal
- if withdrawal was successful it continues with the credit card deposit
- if the deposit fails for some reason it should return the money to the bank account in the compensate-withdraw step
```
### Runtime errors
If you see an error message when running the application or tests you can try to ask the assistant for help finding the bug. Paste the error message in the chat question.
[Developer best practices](dev-best-practices.html) [Operating](../operations/index.html)
- [Akka](../index.html)
- [Understanding](index.html)
- [Building AI agents](ai-agents.html)
# Building AI agents
AI agents are components that integrate with AI to perceive their environment, make decisions, and take actions toward a specific goal. Agents can have varying degrees of human intervention from none (completely autonomous) to requiring a human to approve each action the agent takes.
## Tokens and streaming
Agents interact with AI, most commonly in the form of Large Language Models (LLMs). LLMs are what is known as *predictive text*. This means that every word streamed to the agent is actually just the next word predicted to be in the output. Regardless of platform or language, agents need the ability to stream tokens bi-directionally.
If your agent is consuming an LLM as a service, then you could be paying some amount of money per bundle of tokens. In cases like this, it is crucial to ensure that you have control over how frequently and how many tokens the agent "spends."
## Different types of AI
LLMs are everywhere these days and it is impossible to escape all of their related news. It would be easy to assume that all agents interact with LLMs whether they are self-hosted or provided as an external service. This idea does a disservice to the rest of machine learning and AI in particular.
As you develop your teams of collaborative agents, keep in mind that not everything needs to be an LLM and look for opportunities to use smaller, more efficient, task-specific models. This can not only save you money, but can improve the overall performance of your application.
## Prompts, session memory, and context
Agents interact with LLMs through prompts. A prompt is the input to an LLM in the form of natural language text. The quality and detail of your agents' prompts can make the difference between a great application experience and a terrible one. The prompt sent to an LLM typically tells the model the role it is supposed to play, how it should respond (e.g. you can tell a model to respond with JSON).
Take a look at the following sample prompt:
```none
You are a friendly and cheerful question answerer.
Answer the question based on the context below.
Keep the answer short and concise. Respond "Unsure about answer"
if not sure about the answer.
If asked for a single item and multiple pieces of information
are acceptable answers, choose one at random.
Context:
Here is a summary of all the action movies you know of. Each one is rated from 1 to 5 stars.
Question:
What is the most highly rated action movie?
```
Everything except the **question** above would have been supplied by the agent. Working with and honing prompts is such an important activity in agentic development that a whole new discipline called [prompt engineering](https://www.promptingguide.ai/) has sprung up around it.
The context in the preceding prompt is how agents can augment the knowledge of an LLM. This is how Retrieval Augmented Generation (RAG) works. Agents can participate in sessions where the conversation history is stored. You see this in action whenever you use an AI assistant and it shows you a history of all of your chats. Session management and persistence is a task every agent developer needs to tackle.
## Agent orchestration and collaboration
Each agent should do *one thing*. Agents should have a single goal and they can use any form of knowledge and model inference to accomplish that goal. However, we rarely ever build applications that only do one thing. One of the super powers of agents is in *collaboration*.
There are protocols and standards rapidly evolving for ways agents can communicate with each other directly, but agents also benefit from indirect communication.
Whether you have 1 agent or 50, you still need to be able to do things like recover from network failure, handle timeouts, deal with failure responses, broken streams, and much more. Just for individual agents you will need an orchestrator if you want that agent to be resilient at scale. With dozens of agents working together with shared and isolated sessions, they will need to be managed by supervisors.
For more detail on orchestration, check out our [agentic orchestration patterns](ms-agent-patterns.html) section.
## Agent evaluation
The answers your agents get from models are *non-deterministic*. They can seem random at times. Since you can’t predict the model output you can’t use traditional testing practices. Instead, we need to do what’s called **evaluation**. Evaluation involves iteratively refining a prompt.
You submit the prompt to the model and get an answer back. Then, we can use *another model* to derive metrics from that response like confidence ratings. This is often called the "LLM-as-judge" pattern.
Rather than a unit test, we often have entire suites of evaluation runs where we submit a large number of prompts, derive analytics and metrics from the replies, and then score the model-generated data as a whole. This is tricky because you can very easily have an evaluation run that has a high confidence score but still somehow manages to contain [hallucinations](https://www.ibm.com/think/topics/ai-hallucinations).
## Foundational AI Concepts (video)
Vectors, embeddings, and Retrieval-Augmented Generation (RAG) are core concepts behind modern AI systems, especially those involving large language models (LLMs). Whether you’re just beginning your journey into AI or brushing up on terminology that’s increasingly appearing in development workflows, this is a great place to start.
The following video is an informal walkthrough of foundational AI concepts that underpin tools like ChatGPT, RAG, and semantic search.
Topics covered in the video include:
- What vectors are and why they’re foundational to AI
- How embeddings turn human input into machine-readable vectors
- The role of vector distance and similarity metrics (e.g., Euclidean vs. cosine)
- How vector databases support semantic search
- The RAG pattern for enriching LLM prompts
- Why prompt structure, token count, and caching all matter
- How concepts like agency and stateful workflows connect to agentic AI and Akka
[Endpoints](grpc-vs-http-endpoints.html) [Inter-agent communications](inter-agent-comms.html)
- [Akka](../index.html)
- [Understanding](index.html)
- [Distributed systems](distributed-systems.html)
# Distributed systems
Modern distributed systems—whether agentic AI, microservices applications, or edge computing—demand more than just scalable infrastructure. They require systems that are resilient under stress, responsive under load, elastic with demand, and maintainable at scale. Akka is built from the ground up on proven battle-tested principles of distributed computing, reflecting more than a decade-long commitment to applying architectural discipline to the nondeterminism and chaos of concurrency, distribution, and failure.
| | Akka’s approach is to make the *inherent complexity* of the problem space—the *nondeterminism* of distributed systems and *stochastic* nature of LLMs—first-class in the programming model, allowing it to be managed and kept under control as the system grows over time. |
This is to avoid leaky abstractions that force you to pay the price later (when moving to production) through unbounded and undefined compounded *accidental complexity*. Accidental complexity can, if not kept under control, add exponential cost in terms of maintainability, understandability, extensibility, and overall infrastructure costs.
## Rooted in the Reactive Manifesto and the Reactive Principles
At the core of Akka’s design philosophy is the [Reactive Manifesto](https://reactivemanifesto.org/) and the [Reactive Principles](https://www.reactiveprinciples.org/).
The **Reactive Manifesto** defines the four fundamental high-level traits of a well-architected distributed system:
| Trait | Description |
| --- | --- |
| Responsive | The system responds in a timely manner. Responsiveness is the cornerstone of usability and utility, and it underpins other aspects of the system. |
| Resilient | The system stays responsive in the face of failure. This applies not only to highly-available, mission-critical systems—but also to every user-facing system where failure impacts user experience. |
| Elastic | The system stays responsive under varying workload. It can scale up or down as needed without compromising responsiveness. |
| Message-Driven | The system relies on asynchronous message passing to establish a boundary between components. This ensures loose coupling, isolation, and location transparency. |
The **Reactive Principles** distils these four traits into a set of foundational guiding principles for great distributed systems design:
| Principle | Description |
| --- | --- |
| Stay Responsive | Ensure the system always responds in a timely and consistent manner to promote user confidence and system predictability. |
| Accept Uncertainty | Embrace the inherent nondeterminism in distributed systems and build designs that can tolerate and adapt to it. |
| Embrace Failure | Design for failure as a first-class concern by building fault tolerance and recovery into the architecture. |
| Decentralize | Distribute responsibility across components and teams to avoid single points of failure or contention. |
| Isolate State | Ensure state is encapsulated and protected from concurrent access to avoid race conditions and promote scalability. |
| Communicate via Messages | Use asynchronous message passing to decouple components, enabling better concurrency, fault tolerance, and scalability. |
Akka embodies these principles as concrete implementation guidelines. Every feature reinforces predictable, manageable, and observable behavior at scale. This applies to durable in-memory event-sourced persistence, streaming view projections, multi-region/multi-cloud replication, CRDT-based data coordination, cluster membership, and sharding.
## Grounded in distributed systems patterns and principles
The foundation of Akka is detailed in the [O’Reilly Technical Guide: Principles and Patterns for Distributed Application Architecture](https://content.akka.io/guide/principles-and-patterns-for-distributed-application-architecture) (authored by Akka CTO and founder Jonas Bonér). Psst - get a free copy by clicking the link! This guide outlines architectural patterns that are essential for building robust systems, including how to leverage:
- Event sourcing and CQRS for reliable state management and auditability.
- Event-driven communication, coordination, and integration.
- Consistency boundaries with command and side-effect separation to maintain deterministic behavior under concurrency, balancing strong and eventual consistency.
- Location transparency for dynamic system topology, fault tolerance, and elastic scalability.
- Autonomous stateful agents/services with temporal guarantees are crucial for maintaining consistency across systems of distributed agents.
- Backpressure and flow control, ensuring that communication channels between services or agents never become bottlenecks or cause failure due to data overload.
- Failure signaling and supervision, allowing systems to self-heal and degrade gracefully.
- Automatic and transparent self-replication of agents and services for failover, redundancy, and scale.
These constructs are operationalized in Akka’s runtime through [Agents](../sdk/agents.html), [Entities](../sdk/event-sourced-entities.html), [Views](../sdk/views.html), [Endpoints](../sdk/http-endpoints.html), [Workflows](../sdk/workflows.html), and [Consumers](../sdk/consuming-producing.html) backed by actors, event-sourced persistence, multi-region replication, durable streaming real-time projections, and sharded clusters—all battle-tested in production systems across industries for over a decade, providing a tuned and proven runtime for enterprise-grade services.
## Designed for multi-agent AI
Multi-agent AI systems combine the inherent *nondeterminism* of distributed systems with the *stochastic* behavior of AI models, particularly those based on large language models (LLMs). This dual complexity means traditional software design, development, and operations approaches are insufficient.
The demands of multi-agent AI systems—which involve large numbers of autonomous, stateful, and often long-lived agents—require managing complexity around orchestration, streaming, memory, and temporal behaviors while being able to reason about the system as a whole and embrace its stochastic and non-deterministic nature. Akka’s approach to multi-agent architectures includes:
- Actor-based isolation and concurrency control for stateful [Agents](../sdk/agents.html) that must reason and act independently while coordinating with others.
- Asynchronous messaging and streaming decouple computation from communication, allowing for flow control and resilient communication between [Agents](../sdk/agents.html), critical for latency-sensitive inference or decision-making.
- Operational resilience, with fully replicated stateful [Agents](../sdk/agents.html) that restart and recover in place.
- Automatic short-term (session) and long-term memory through the [Agent’s](../sdk/agents.html) built-in durable in-memory storage, allowing replayability through event logs, ensuring agents can recover, reflect, reason, and explain past behavior.
- Dynamic scaling and routing are done through automatic and transparent sharding and cluster management.
- Loose coupling and evolvability, aided by schema-versioned messages and contract-first APIs.
- Multi-region replication based on CRDTs for collaborative knowledge sharing and eventual consistency without global locking.
## Why It Matters
Building agentic AI systems—or modern cloud-native microservices—on unstable foundations leads to brittle architectures that fail under real-world conditions. Akka mitigates this risk by enforcing principles and patterns anticipating failure, load, inconsistency, and change.
Whether deploying thousands of autonomous AI agents or orchestrating business-critical microservices, Akka gives you the architectural clarity and operational reliability to build systems that thrive in the real world, not just in theory.
[Concepts](concepts.html) [Project structure](architecture-model.html)
<# examples>